
In this article, I’ll be showing you how to use OWIN 2.0 specification to secure ASP.NET Web API v2 from scratch. If you are looking for a token-based authentication and dual authorization based on claims or finding a way to have an independent self-host without using the IIS security architecture, then this article is for you.
There are tons of information and sample codes out there in the wild, but with the rapid pace of advancement in technologies over the year, many sample codes become old or not working anymore. I feel the results from the search engines were like archeological sites that contain different things from different eras. One has to sort it out to reason it. Since time flies quickly, this article will be outdated one day as well and be dumped into one of these archeological sites just like the others, but I’ll show you exactly what technologies I used to build the sample codes in details. We're going to build the latest token-based authorization / authentication for modern apps that are self-host and .NET focused solution. The objective is to show you how OAuth 2.0 authorization work from requesting the access token and use it to access protected API and then see the refresh token in action. Many security practices have omitted and we only show you the minimal code to achieve our objective and it cannot be used in the production environment as is. I assume you will do your own database and security strategies. Lastly, we will also show you how to use tool to communicate with our OWIN/OAuth solution and develop a simple console to interact with the host.
There are tons of information and sample codes out there in the wild, but with the rapid pace of advancement in technologies over the year, many sample codes become old or not working anymore. I feel the results from the search engines were like archeological sites that contain different things from different eras. One has to sort it out to reason it. Since time flies quickly, this article will be outdated one day as well and be dumped into one of these archeological sites just like the others, but I’ll show you exactly what technologies I used to build the sample codes in details. We're going to build the latest token-based authorization / authentication for modern apps that are self-host and .NET focused solution. The objective is to show you how OAuth 2.0 authorization work from requesting the access token and use it to access protected API and then see the refresh token in action. Many security practices have omitted and we only show you the minimal code to achieve our objective and it cannot be used in the production environment as is. I assume you will do your own database and security strategies. Lastly, we will also show you how to use tool to communicate with our OWIN/OAuth solution and develop a simple console to interact with the host.
Is it just me?
There are many confusions in the internet describing a simple OWIN working solution. Many samples contained old technologies and mixed with other infrastructure like data model and other unnecessary components to make it work. The OAuth/OWIN technology is somewhat simple and elegant, but the learning experience could be frustrating if you are new. It seems like some people on the internet purposely try to confuse you so they can sell you a paid service to do an OAuth solution? Never mind the conspiracy theory, before we dive into details, it is imperative to know a few things to see the big picture of how OWIN and Katana can help us to build our solution.
What is OAuth 2.0?
OAuth 2.0 is a protocol that is independent of Microsoft, and it provides an authorization framework that enables communications between two or more independent HTTP services like Web API. Many open source communities and vendors like Microsoft develop their own OAuth 2.0 solutions based on this specification. The specification describes how a requestor requests for an access token from the authorization server, and what keys and values needed for its submission through a POST action via HTTP and the policies on how the authorization server should respond to the request.
One of the confusions about learning the OAuth or OWIN is not because of the OAuth itself but because of its flexibility. Great flexibility is sometimes not a good thing for beginners. Many components are created to work interchangeably in the OAuth framework, and many such components are open source with different names. By looking at the names themselves, one cannot comprehend its role in the framework. In this paper, we will be focusing on the Microsoft’s solution on OAuth.
One of the confusions about learning the OAuth or OWIN is not because of the OAuth itself but because of its flexibility. Great flexibility is sometimes not a good thing for beginners. Many components are created to work interchangeably in the OAuth framework, and many such components are open source with different names. By looking at the names themselves, one cannot comprehend its role in the framework. In this paper, we will be focusing on the Microsoft’s solution on OAuth.
Order your dinner to go tonight?
If you still have problems of understanding them at this point, let me put them in some analogies. OAuth is just like a dinner, where Microsoft’s OAuth is like Japanese Food, and katana is like the Terri Chicken with Shrimp Tempura. So you could have Mexican Food or Chinese Food for your OAuth dinner. There are many mixed combinations of components to create your own special dinner. I apologized if I further confused you, but please continue reading and keep these analogies in mind.
OWIN for .NET Developers
Microsoft creates an open standard called Open Web Interface for .NET or known as OWIN, and the actual implementation of the OWIN is called Katana.
For examples, just for OWIN itself, there are names like Katana, Nancy, Jasper, Suave, Nowin, ACSP.NET, Freya, ASP.NET Web API, ServiceStack, HttpListener, and the list can go on and on. Some components are deprecated, and some belong in one of these components: Host, Server, and Middleware.
Katana is a collection of OWIN-compatible components that make the whole architecture. Our perceptions about host and server have changed. You should think Server and Host as functional components that serve other components in the architecture, rather than hardware server or IIS web server. The Host manages the whole environment from initiating to launching the process. An example of the server will be the authorization server that takes care of authorization and granting token at the end. The Middleware contains layers of various frameworks that manipulate the ins and outs of the properties in the pipelines. Each framework can be a function or act as a smaller application for a complex need, or this bare framework can be just a simple DelegatingHandler or a special Func Dictionary.
using AppFunc = Func<IDictionary<string, object>, Task>; // Enviornment data in dictionary and Task done
app.Use(ctx, next) => { await ctx.Response.WriteAsync(“<html><head></head><body>Hello guys!</body></html>”) });
where ‘app’ is the IAppBuilder in the Configuration() and ctx is the OwinContext(environment) and ‘next’ is AppFunc.
app.Use(ctx, next) => { await ctx.Response.WriteAsync(“<html><head></head><body>Hello guys!</body></html>”) });
where ‘app’ is the IAppBuilder in the Configuration() and ctx is the OwinContext(environment) and ‘next’ is AppFunc.
The additional setting in the HttpConfiguration object will be the last step or layer of the middleware.
Fortunately, with Katana, we don’t need to write a lot of codes. When you install the System.Web.Http.Owin assembly, you can use UseWebApi method derived from WebApiAppBuilderExtensions class to complete our pipeline by binding middleware together. Because of the Web API’s host adapter design, it allows components to be arranged in a pipeline structure and allows decoupling of other components so every component in the Middleware can perform different tasks in a request or response. With an optional ‘scope’ properties, the developer can further scope certain APIs or Middleware layers to smaller tasks.
var config = new HttpConfiguration();
app.UseWebApi(config);
Please note that all methods used in the Middleware are all asynchronous task-based method. If there an error has occurred, it should immediately return an error response to the caller rather than continue to the next pipeline. The implementation of OWIN assumes that the communication is over an SSL/TLS connection. So we only set AllowInsecureHttp = true in the development environment when we are setup the OAuthAuthorizationServerOptions portion of the codes.
Let's start coding Katana
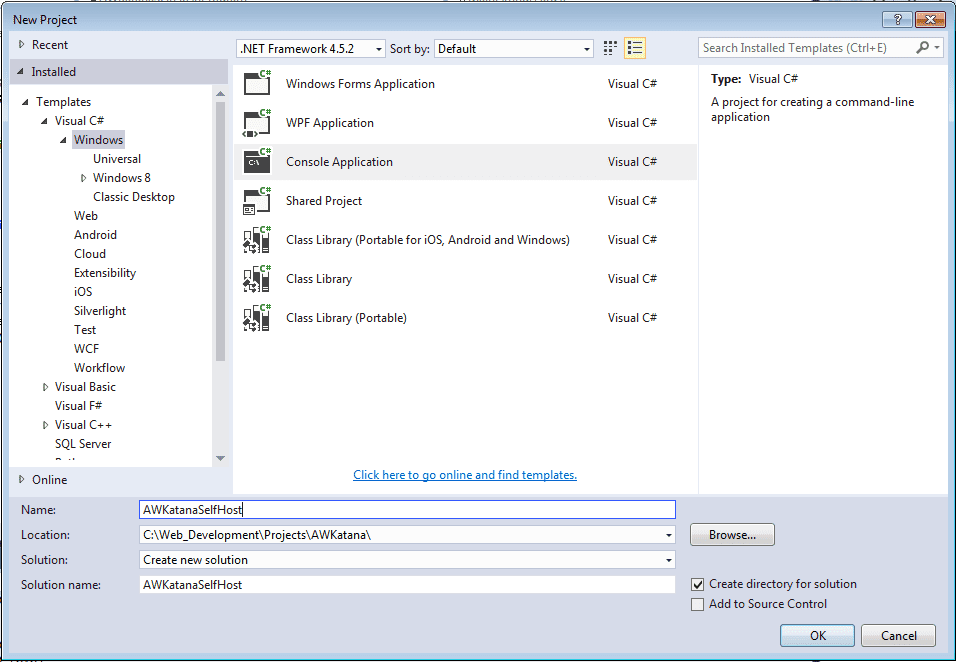
You need to have at least Visual Studio 2013 or above to build this project. We are going to create two separate solutions, and each solution is going to have one project. One project is for making the Host, and the other project is for building the Client. Now let’s create the Host project.
Project 1: Create AW Katana Self Host Server
The purpose of this project is to create a self-host server with katana OWIN spec that is minimal for grant requestor access token and process refresh token without the database.
Visual Studio 2015 Community Version
Project Type: Windows Console Application with .NET Framework 4.5.2
Project Name: AWkatanaSelfhost
Package Install:
Microsoft.Owin.Host.Systemweb
In Package manager console:
PM> Install-Package Microsoft.Owin.Host.Systemweb
Install-Package Microsoft.AspNet.Identity.Core
Install-Package Microsoft.AspNet.Identity.Owin
Install-Package Microsoft.Owin.Security
Install-Package Microsoft.Owin.Hosting
Install-Package Microsoft.AspNet.WebApi.Owin
Install-Package Microsoft.Owin.Host.HttpListener
1. Create a new project, Select Console Applicaton with .NET framework 4.5.2
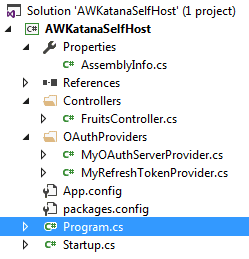
2. Create two folders: Controllers and OAuthProviders
3. Open Program.cs file, and we will build a self-host web server in here. By using Microsoft.Owin.Hosting, you can add WebApp object in it and instruct the host to start the application from Startup class, which we will be building in the next step.
static void Main(string[] args)
{
string baseUri = "http://localhost:8000";
Console.WriteLine("Starting web Server...");
WebApp.Start<Startup>(baseUri);
Console.WriteLine("Server running at {0} - press Enter to quit. ", baseUri);
Console.ReadLine();
}
static void Main(string[] args)
{
string baseUri = "http://localhost:8000";
Console.WriteLine("Starting web Server...");
WebApp.Start<Startup>(baseUri);
Console.WriteLine("Server running at {0} - press Enter to quit. ", baseUri);
Console.ReadLine();
}
4. Create a class called “Startup.cs” and inside of this file, add two references: System.Web.Http and Microsoft.Owin. This is the place where we are building the OWIN with Katana component architecture. Using Microsoft’s OWIN IAppBuilder at the first method called configuration, we can build the OWIN HTTP pipelines. There are just 3 separate tasks to build it. One is to configure the IAppBuilder app by supplying it with information like the token path and provider and custom options for Authentication pipeline since we are going to build our own token and refresh token. Second is to map the route of our resource. The third task will be bring the route information from the HttpConfiguration into the last pipeline.
public void Configuration(IAppBuilder app)
{
ConfigureAuth(app);
var webApiConfiguration = ConfigureWebApi();
app.UseWebApi(webApiConfiguration);
}
5. Create MyOAuthServerProvider class in the oAuthProviders folder. This class is the brain of the entire architecture, where it validates the incoming credential against the security data we have on the server. First, it analyzes the incoming data and determines if this is a new requestor for the access token or a return requestor who requests the renewal access token by using the refresh token. The ValidateClientAuthentication method will decipher the incoming data and determine the next action. If it receives user and password and the grant type is password, it will pass to GrantResourceOwnerCredential method for further verification and will determine to grant an access token or reject to the requestor. If it receives refresh token and the grant type is refresh_token, then the GrantRefreshToken method will receive the call from the ValidateClientAuthentication method, and then it will issue a brand new ticket containing the new access token when it is validated.
6. Create MyRefreshTokenProvider class. This class is self-explanatory where we implement the IAuthenticationTokenProvider interface from the OWIN.Security. Here we can customize our refresh token. In our project, we just create it as GUID data type.
7. Create a simple API called FruitController as our resource where the requestor can access our secret Fruit List after their credential has been verified and use the obtained token to access the API. There is no need to pass the username and password again when accessing the protected resource. The API can be protected by simply using the [Authorize] attribute in front the controller or individual method.
The Self-Host project is now completed with 7 simple steps.
The Secret Recipe of Refresh Token
Many articles and code samples explaining the OWIN usually stop at how to generate the access token and did not reveal the mechanism of how the refresh token work in codes. The trick is not in the MyRefreshTokenProvider, but rather, it’s in the MyOAuthServerProvider class. The OWIN’s specification said the only required parameters are “grant_type” and “refresh_token” like showing below:
grant_type: refresh_token
refresh_token: 3a3aebea-4150-4850-8e37-ace1d9eead9a [this is our sample and you may have other format]
There are many ways to accomplish the same thing, but in our project, the trick is to have another authentication property called “as:client_id” hidden in the original ticket when the requestor requested for the first time. When the return requestor comes again with the refresh token and asks for a new access token, the ValidateClientAuthentication method can verify the clientId and clientSecret against the original ticket so that we are sure that this requestor is the original requestor. Without this trick, the GrantRefreshToken method will never receive the call even the grant_type and refresh_token parameters have been passed in. A generic error message, such as “invalid_grant” can be resulted, and you may not know why.
Project 2: Create AW Katana Client
This Client app will be the requestor for the AW Kantana Self-Host.
Create another .NET console project in another Solution, and we are going to build the Client that requests the access token to access the protected resources.
Project Type: Windows Console Application with .NET Framework 4.5.2
Project Name: AWkatanaClient
Package Install:
PM> Install-Package Microsoft.AspNet.WebApi.Client
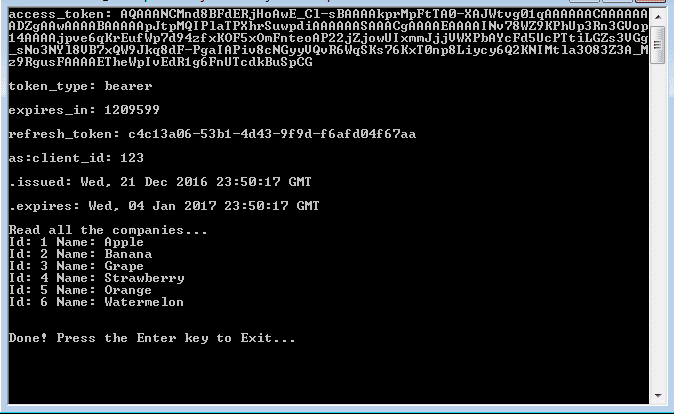
I’ve created two separate methods in the Main(). One is to demonstrate how refresh token works, and another method demonstrates how to access protected resource. You can comment out one of them to examine the mechanism of token generation and consumption. Please run the AWKatanaHost project first and then AWkatanaClient later in order to have a correct testing experience. See the results below:
Create another .NET console project in another Solution, and we are going to build the Client that requests the access token to access the protected resources.
Project Type: Windows Console Application with .NET Framework 4.5.2
Project Name: AWkatanaClient
Package Install:
PM> Install-Package Microsoft.AspNet.WebApi.Client
I’ve created two separate methods in the Main(). One is to demonstrate how refresh token works, and another method demonstrates how to access protected resource. You can comment out one of them to examine the mechanism of token generation and consumption. Please run the AWKatanaHost project first and then AWkatanaClient later in order to have a correct testing experience. See the results below:
How to use Postman to test your Katana Host?
Postman is a tool that you can install or add to Chrome as an add-in. Basically, Postman acts as a client that passes an HTTP POST with your desired parameters in the header and body to the host. Before you use the tool, you need to have a solid understanding of how client-server communicates. The communication is made possible because of HTTP protocol contains rules and information in their request/response body which dictates how client like the browser to behave and how the server should handle. To test our AWkatanaSelfhost project, we need to use “POST” instead of the “GET” action. Download Postman
How to emulate a client requests for the access token for the first time?
1. Change to “POST” from the drop down list
2. On the url text box: http://localhost:8000/Token
3. Click on “Body” tab, and ignore “Authorization” and “Headers” tabs
3. Select radio button: application/x-www-form-urlencoded
4. Add the following keys and values
grant_type: password
username: arthur@startrek.com
password: enterprise
client_id: 12345
client_secret: secret
5. Click on the “Send” button
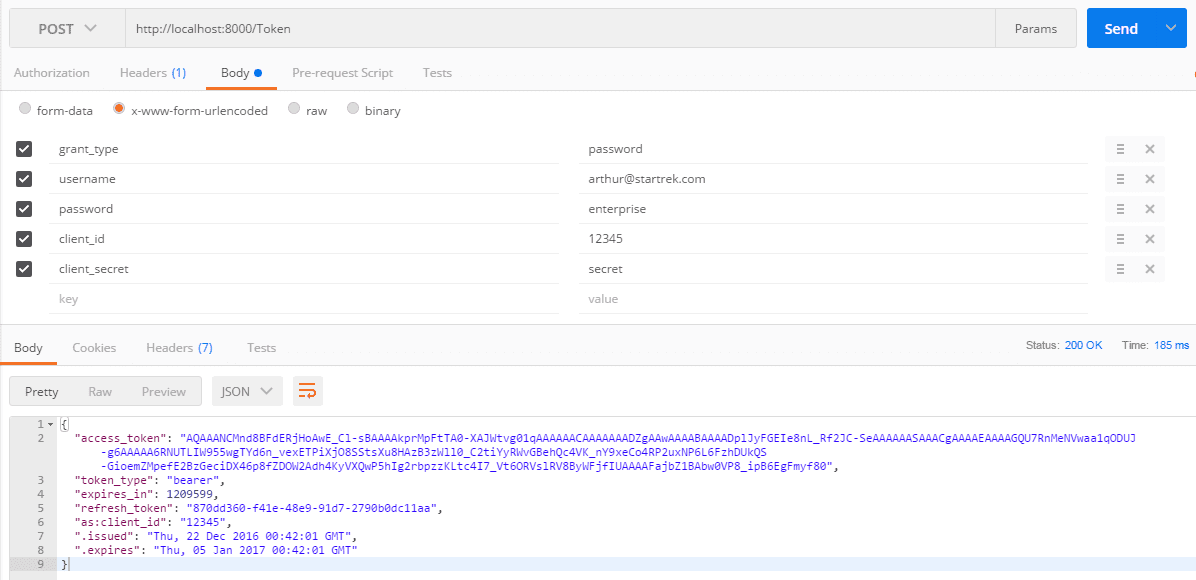
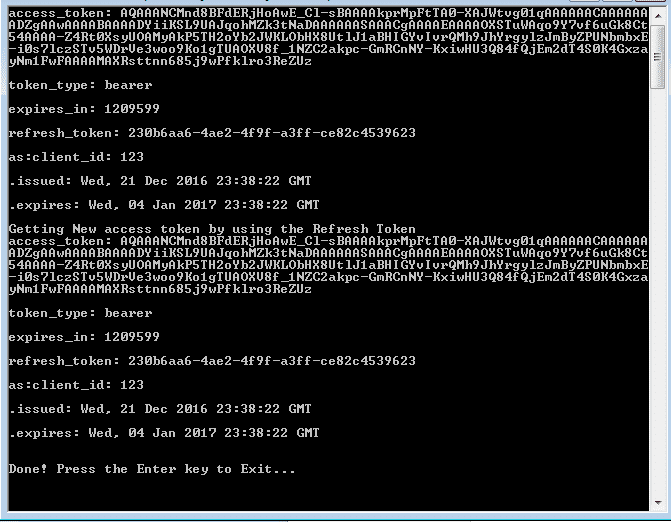
Emulating a client requests for the access token for the first time
How to emulate a client to access the protected resources?
1. Copy the access_token value from previous response body [yes, the whole thing; 3 lines]
2. Create another tab and change to “POST”
3. On the url text box: http://localhost:8000/api/Fruits
4. Click on “Headers” tab, and put this key and value [Remember: in headers and NOT in body]
Authorization: Bearer AQAAANCMnd8BFdERjHoAwE_Cl-A..<---your access token code here
5. Click on the “Send” button
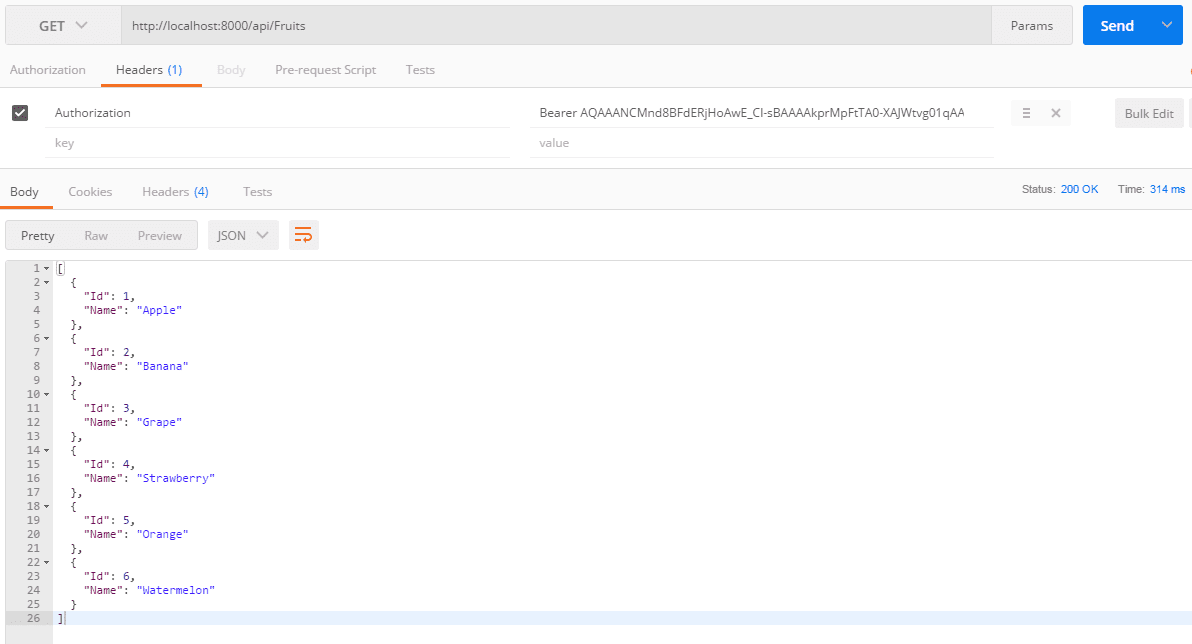
Emulating a client to access the protected resources, ../api/fruits
How to obtain the new access token from your refresh token?
1. Copy the refresh_token value from the first response body [e.g. 870dd360-f41e-48e9-91d7-2790b0dc11aa]
2. Create another tab and change to “POST”
3. On the url text box: http://localhost:8000/Token
4. Click on “Body” tab, and put this key and value
grant_type: refresh_token
refresh_token: 870dd360-f41e-48e9-91d7-2790b0dc11aafrom step #1
client_id: 12345
client_secret: secret
5. Click on the “Send” button
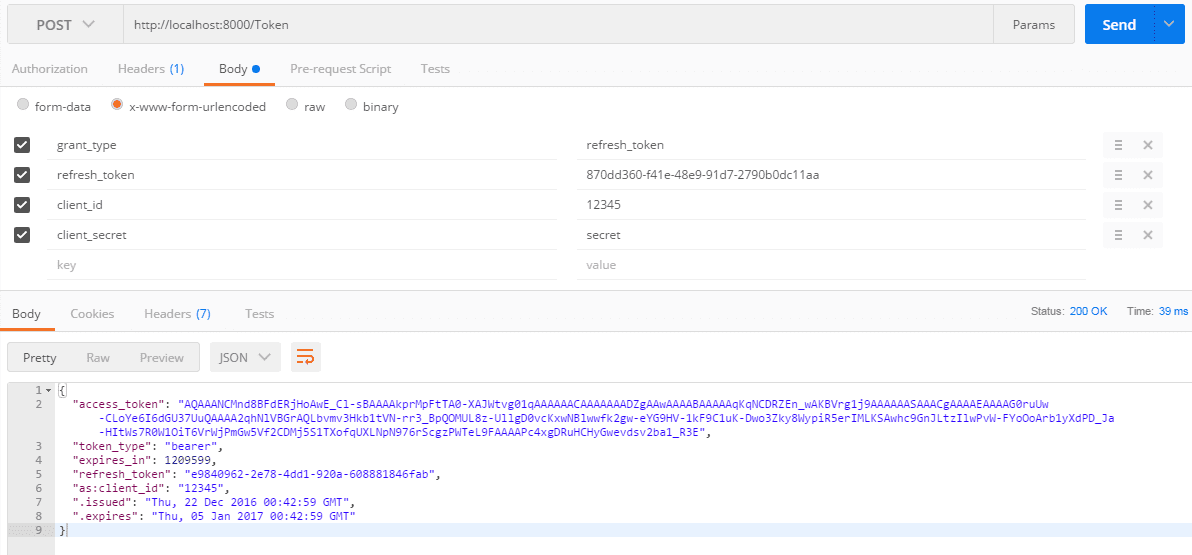
Emulating how to use your refresh token to obtain the access token again
Summary
I hope this article is fun and helpful for you to learn to use OAuth 2.0 to secure your API services by using Katana. You can download the codes from here:
Useful Links
Postman Tool - https://www.getpostman.com
OAuth 2.0 Official Standards- https://tools.ietf.org/html/rfc6749#section-4.3.2
Useful Links
Postman Tool - https://www.getpostman.com
OAuth 2.0 Official Standards- https://tools.ietf.org/html/rfc6749#section-4.3.2
 RSS Feed