
Introduction
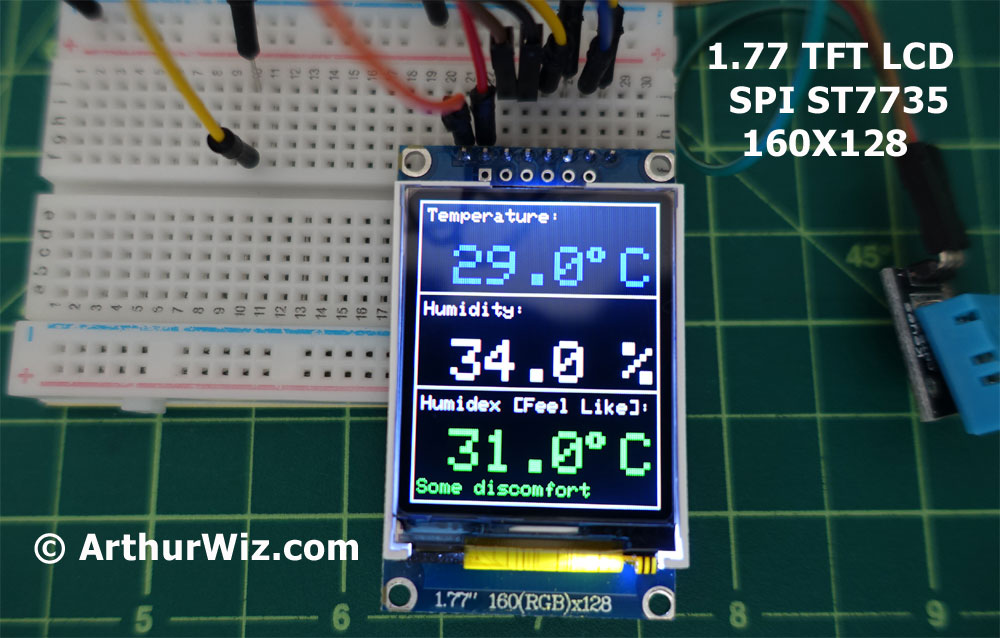
There is little information on the Internet with a combination of this 1.77 inch TFT LCD work on Arduino Mega board. Most of the information is covering the 1.8 inch TFT LCD, and it is a little bit tricky to make this works since the connections on the board, and the code/driver may be different from other LCDs. We use this opportunity to explain the technology behind it besides just showing the readers its schematics. Later, we'll show how to display both the temperature and humidity on the LCD with the DHT-11 sensor.
Materials
How Arduino board communicates with a device?
In a simple analogy, a computer uses a computer program, device driver, to talk to hardware like a printer and in the Arduino board, there is a microcontroller also uses some drivers to communicate with the LCD device. The communication between the microcontroller and devices can be parallel and/or serial when we look at it from the data transmission level. When we wired two LED lights with two separate I/O PINs on the board, we let the microcontroller sending the data in a parallel fashion. In the serial transmission, the data transmit one bit of data at a time, sequentially, over a communication channel called the bus. In web programming, we have the luxury of sending more complex data on a broader bandwidth, like JSON, a key-value pair data, when comparing with the low-level programming in electronics. There is a pulsing technique controlled by a clock, transmitting one bit every clock pulse. In this way, it compensates for the narrow path for data to pass through while maintaining the understanding of who is talking to whom or how to interpret the pieces of bit information that a device receives. With the clock speed, we can distinguish the data chunk out from the signal stream. It acts like traffic lights in the busiest city where all devices in the SPI bus shared the same clock as it maintains the data flow synchronized and controlled. As a result, paired its data line with a clock signal, the data is transferred synchronously. Many protocols are using this type of methods to communicate, such as SPI, and I2C. In our case, the LCD uses the Serial Peripheral Interface (SPI) protocol to communicate with the microcontroller on the Arduino board. Just like on the Internet, HTTP is a protocol for data communication between a web server and a client computer.
The SPI enabled device typically has the following pins:
The sequence of the events in serial data transmission is initialized when the SS pin set low as in active mode for the slave device. Otherwise, it simply ignores the data sent from the master or the microcontroller on the Arduino board in this scenario since all devices on the SPI bus share the MISO, MOSI, and SCLK lines and the message arrives at the slave devices at the same time. Only the devices that the master wants to communicate have its SS pin set low. During the data transmission, the master begins to toggle the clock line up and down at speed supported by the slave device. For each clock cycle, it sends one bit on the MOSI line, and receive one bit on the MISO line. Until stopping the toggling of the clock line, the transmission is complete, and now the SS pin is returned with a high state. A reset is triggered, and the next sequence of data transmission can be started again. It looks like a controlled escalator moving people up and down in light speed!
In slow motion, when SS (CS) Pin is low, the ST7735S controller chip on the slave device understands that the data carried in two lines, SCK and SDA is a command from the master. When high, the data signal is being sent from the slave to master via a register select signal called RS.
The SPI enabled device typically has the following pins:
- MISO (Master In Slave Out) – A line for sending serial data to the Master device
- MOSI (Master Out Slave In) – The Master line for sending serial data to slave devices
- SCK/SCLK (Serial Clock) – A clock signal generated by the Master device to synchronize data transmission, so the slave device knows when to read the input.
- SS – A line indicating slave device selection
- RESET - A line for restarting the transmission process.
The sequence of the events in serial data transmission is initialized when the SS pin set low as in active mode for the slave device. Otherwise, it simply ignores the data sent from the master or the microcontroller on the Arduino board in this scenario since all devices on the SPI bus share the MISO, MOSI, and SCLK lines and the message arrives at the slave devices at the same time. Only the devices that the master wants to communicate have its SS pin set low. During the data transmission, the master begins to toggle the clock line up and down at speed supported by the slave device. For each clock cycle, it sends one bit on the MOSI line, and receive one bit on the MISO line. Until stopping the toggling of the clock line, the transmission is complete, and now the SS pin is returned with a high state. A reset is triggered, and the next sequence of data transmission can be started again. It looks like a controlled escalator moving people up and down in light speed!
In slow motion, when SS (CS) Pin is low, the ST7735S controller chip on the slave device understands that the data carried in two lines, SCK and SDA is a command from the master. When high, the data signal is being sent from the slave to master via a register select signal called RS.
Setting Up the LCD
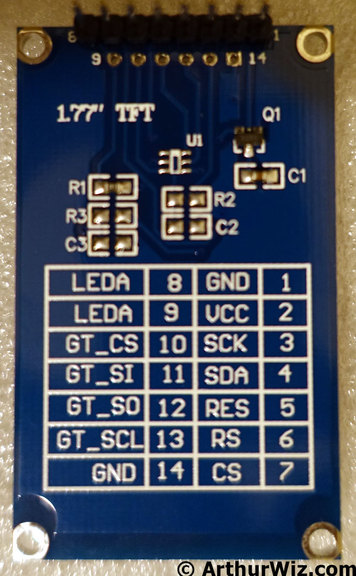
This particular 1.77 inch TFT LCD has a 160x128 dimension, and it has 8 pins and 6 reserved holes (showing as 9 to 14) as shown below.
Communication Pins Connections
Arduino Pin |
LCD PIN |
Other Name |
PIN Purpose |
Constructor 1 |
Constructor 2 |
3.3V |
8 LEDA |
Lite |
Backlight control |
||
10 |
7 CS |
Chip Select / DC (Data/Command) |
SS PIN / SPI data or command selector [SS = Slave Select] |
Yes |
Yes |
9 |
6 RS |
Register Selection |
MISO - Sending to Master |
Yes |
Yes |
8 |
5 RES |
Reset / RST |
Reset the TFT |
Yes |
Yes |
11 |
4 SDA |
Serial Data |
MOSI - Sending to Slave |
Yes |
|
13 |
3 SCK |
SCLK - Clock Line |
SPI Clock Input |
Yes |
|
5V |
2 VCC |
Voltage Common Collector |
|||
GND |
1 GND |
Ground |
Ground |
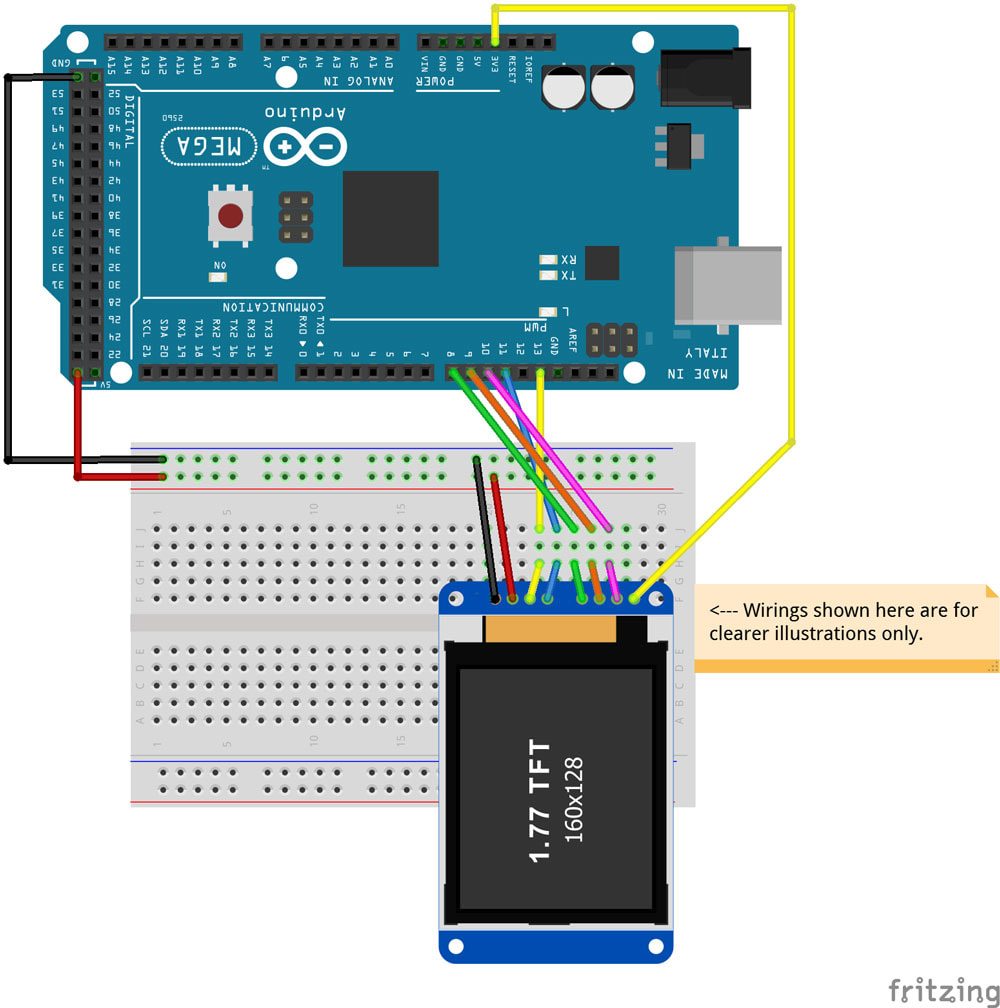
Breadboard View
Coding Time!
In the Arduino IDE, we include the Adafruit_ST7735 TFT library to control the LCD device and Adafruit_GFX library to handle graphics operation.
Download library:
https://adafru.it/dXk
https://adafru.it/cBB
How to install the library in the Arduino IDE: https://adafru.it/aYM
There are two constructors in the Adafruit_ST7735 class:
Download library:
https://adafru.it/dXk
https://adafru.it/cBB
How to install the library in the Arduino IDE: https://adafru.it/aYM
There are two constructors in the Adafruit_ST7735 class:
- Adafruit_ST7735 tft = Adafruit_ST7735(TFT_CS, TFT_DC, TFT_RST);
- Adafruit_ST7735 tft = Adafruit_ST7735(TFT_CS, TFT_DC, TFT_MOSI, TFT_SCLK, TFT_RST);
To do a simple HelloWorld on the LCD to see if it works, you can use this code:
https://github.com/Arthurwiz/ST7735-TFT-LCD-1.77-Inch/blob/master/ST7735s_LCD_HelloWorld.ino
https://github.com/Arthurwiz/ST7735-TFT-LCD-1.77-Inch/blob/master/ST7735s_LCD_HelloWorld.ino
#include <Adafruit_GFX.h>
#include <Adafruit_ST7735.h>
#include <SPI.h>
#define TFT_CS 10
#define TFT_RST 8
#define TFT_DC 9
#define TFT_SCLK 13
#define TFT_MOSI 11
//Adafruit_ST7735 tft = Adafruit_ST7735(TFT_CS, TFT_DC, TFT_RST);
Adafruit_ST7735 tft = Adafruit_ST7735(TFT_CS, TFT_DC, TFT_MOSI, TFT_SCLK, TFT_RST);
void setup(void) {
tft.initR(INITR_BLACKTAB);
tft.fillScreen(ST7735_BLACK);
tft.setTextColor(ST7735_WHITE);
tft.setTextSize(0);
tft.setCursor(30,80);
tft.println("Hello World!");
delay(1000);
}
void loop() {
tft.fillScreen(ST7735_WHITE);
delay(1000);
tft.setTextColor(ST7735_BLACK);
tft.setTextSize(0);
tft.setCursor(30,80);
tft.println("Hey you! You got it!");
delay(500);
}
Congratulations if you see the HelloWorld test is working!
Setup for Displaying Temperature and Humidity and Humindex or the "Feel Like" scale
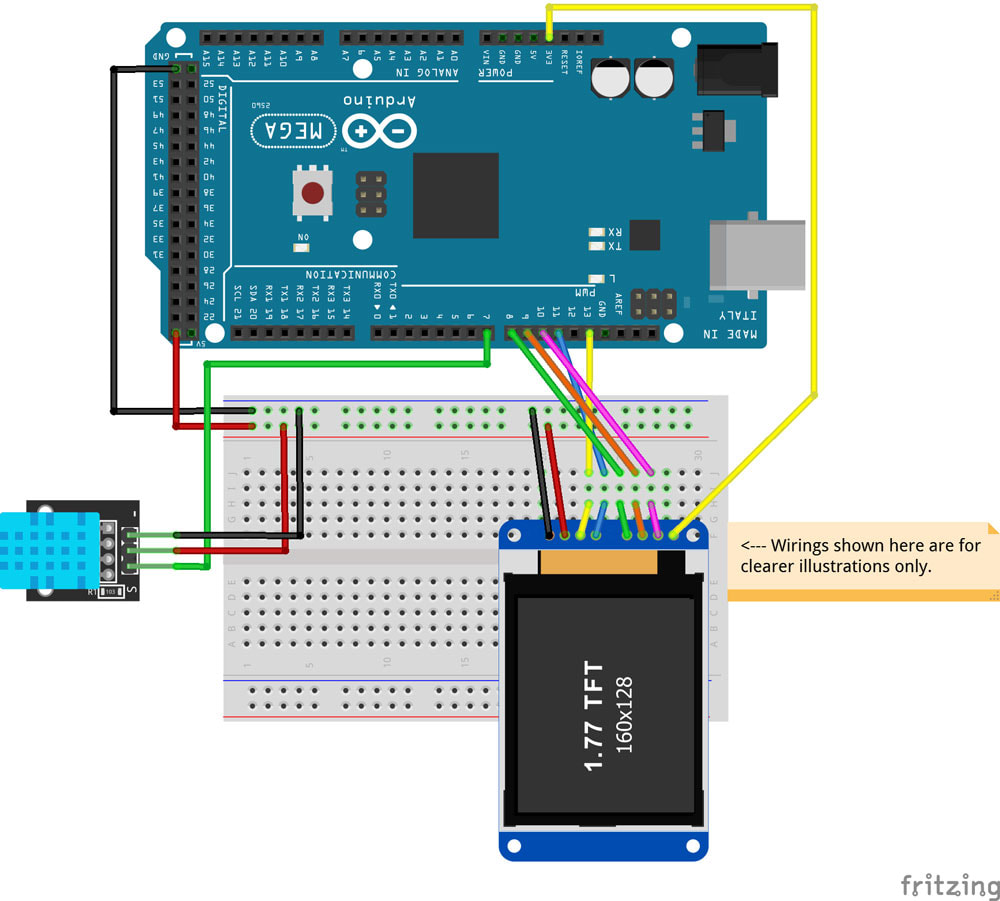
DHT-11 PIN |
Arduino PIN Number |
S |
7 |
+ (Middle PIN) |
5V |
- |
GND |
Breadboard View with DHT-11 Sensor
Here is the code for displaying the information from the sensor:
https://github.com/Arthurwiz/ST7735-TFT-LCD-1.77-Inch/blob/master/ST7735s_LCD_ThermometerSensor.ino
#define TFT_CS 10
#define TFT_DC 9
#define TFT_RST 8
#define TFT_SCLK 13
#define TFT_MOSI 11
#include <Adafruit_GFX.h>
#include <Adafruit_ST7735.h>
#include <SPI.h>
#include <stdio.h>
#include <DHT.h>
#define DHTPIN 7 // DHT11 data pin is connected to Arduino 7 pin.
#define DHTTYPE DHT11
DHT dht(DHTPIN, DHTTYPE);
#if defined(__SAM3X8E__)
#undef __FlashStringHelper::F(string_literal)
#define F(string_literal) string_literal
#endif
//Adafruit_ST7735 tft = Adafruit_ST7735(TFT_CS, TFT_DC, TFT_RST);
Adafruit_ST7735 tft = Adafruit_ST7735(TFT_CS, TFT_DC, TFT_MOSI, TFT_SCLK, TFT_RST);
//Black theme
#define COLOR1 ST7735_WHITE
#define COLOR2 ST7735_BLACK
//White theme
//#define COLOR1 ST7735_BLACK
//#define COLOR2 ST7735_WHITE
int text_color_humidex;
float humidity, temperature, humidex;
String message;
void setup(void)
{
Serial.begin(9600);
// Initialize device.
dht.begin();
Serial.println("DHT Sensor Initalized");
tft.initR(INITR_BLACKTAB); // initialize a ST7735S chip, black tab
tft.fillScreen(COLOR2);
}
void testdrawtext(char* text, uint16_t color)
{
tft.setCursor(0, 0);
tft.setTextColor(color);
tft.setTextWrap(true);
tft.print(text);
}
void loop()
{
// get data from DHT-11
humidity = dht.readHumidity();
temperature = dht.readTemperature();
Serial.print("humidity: "); Serial.println(humidity);
Serial.print("temperature: "); Serial.println(temperature);
//humidex is calculated
humidex = calculate_humidex(temperature, humidity);
// Table
tft.drawRect(0, 0, 128, 160, COLOR1);
tft.drawLine(0, 50, 128, 50, COLOR1);
tft.drawLine(0, 100, 128, 100, COLOR1);
// data is outputed
temperature_to_lcd(temperature, 4);
humidity_to_lcd(humidity, 55);
humidex_to_lcd(humidex, 105);
}
// outputs temperature to LCD
void temperature_to_lcd(float temperature, unsigned char text_position)
{
int text_color;
tft.setCursor(4, text_position);
tft.setTextColor(COLOR1, COLOR2);
tft.setTextSize(1);
tft.print("Temperature:");
tft.setTextSize(3);
if (temperature > 0)
{
text_color = ST7735_BLUE;
}
else
{
text_color = ST7735_BLUE;
}
tft.setCursor(1, text_position + 20);
fix_number_position(temperature);
tft.setTextColor(text_color, COLOR2);
tft.print(temperature, 1);
tft.setCursor(108, text_position + 20);
tft.print("C");
tft.drawChar(90, text_position + 20, 247, text_color, COLOR2, 2); //degree symbol
}
//outputs humidity to LCD
void humidity_to_lcd(float humidity, unsigned char text_position)
{
tft.setTextColor(COLOR1, COLOR2);
tft.setCursor(4, text_position);
tft.setTextSize(1);
tft.println("Humidity:");
tft.setTextSize(3);
tft.setCursor(1, text_position + 20);
fix_number_position(humidity);
tft.print(humidity, 1);
tft.print(" %");
}
//outputs Humidex to LCD
void humidex_to_lcd(float humidex, unsigned char text_position)
{
tft.setCursor(4, text_position);
tft.setTextSize(1);
tft.println("Humidex [Feel Like]:");
tft.setTextSize(3);
tft.setCursor(1, text_position + 17);
if ((humidex >= 21) && (temperature < 44))
{
fix_number_position(humidex);
get_humidex_color_warning_message(humidex);
tft.setTextColor(text_color_humidex, COLOR2);
tft.print(humidex, 1);
tft.setCursor(108, text_position + 17);
tft.print("C");
tft.drawChar(90, text_position + 17, 247, text_color_humidex, COLOR2, 2); //degree symbol
tft.setCursor(3, text_position + 43);
tft.setTextSize(1);
tft.print(message);
}
else
{
tft.print(" --.-");
tft.setCursor(108, text_position + 17);
tft.print("C");
tft.drawChar(90, text_position + 17, 247, COLOR1, COLOR2, 2); //degree symbol
tft.setCursor(1, text_position + 43);
tft.setTextSize(1);
tft.println(" ");
};
}
// aligs number to constant position
void fix_number_position(float number)
{
if ((number >= -40) && (number < -9.9))
{
;
}
if ((number >= -9.9) && (number < 0.0))
{
tft.print(" ");
}
if ((number >= 0.0) && (number < 9.9))
{
tft.print(" ");
}
if ((number >= 9.9) && (number < 99.9))
{
tft.print(" ");
}
if ((number >= 99.9) && (number < 151))
{
tft.print("");
}
}
// Pass 8-bit (each) R,G,B, get back 16-bit packed color
uint16_t Color565(uint8_t r, uint8_t g, uint8_t b)
{
return ((r & 0xF8) << 8) | ((g & 0xFC) << 3) | (b >> 3);
}
//function to calculete Humidex
float calculate_humidex(float temperature, float humidity)
{
float e;
e = (6.112 * pow(10, (7.5 * temperature / (237.7 + temperature))) * humidity / 100); //vapor pressure
float humidex = temperature + 0.55555555 * (e - 10.0); //humidex
return humidex;
}
// Setting text color and message based on Humidex value
void get_humidex_color_warning_message(float humidex)
{
if ((humidex >= 21) && (humidex < 27))
{
text_color_humidex = Color565(0, 137, 0);
message = "No discomfort ";
} // dark green
if ((humidex >= 27) && (humidex < 35))
{
text_color_humidex = Color565(76, 255, 0); // light green
message = "Some discomfort ";
}
if ((humidex >= 35) && (humidex < 40))
{
text_color_humidex = Color565(255, 255, 0);
message = "Great discomfort ";
} // yellow
if ((humidex >= 40) && (humidex < 46))
{
text_color_humidex = Color565(255, 140, 0);
message = "Health risk ";
} //light orange
if ((humidex >= 46) && (humidex < 54))
{
text_color_humidex = Color565(221, 128, 0);
message = "Great health risk ";
} //dark orange
if ((humidex >= 54))
{
text_color_humidex = Color565(255, 0, 0);
message = "Heat stroke danger ";
} // red
}
Conclusions
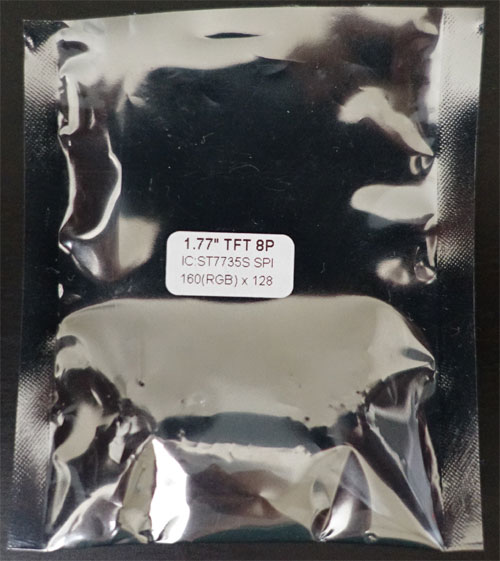
I hope this article helps you set up the 1.77 inch TFT LCD successfully. Sometimes it is difficult to know which library to use when your manufacturer does not provide you with anything else except this label on the package. Remember to make sure that the background and text colors must be different to display characters or else you cannot see anything.
Reference
ST7735S LCD Controller Datasheet - https://www.crystalfontz.com/controllers/Sitronix/ST7735S/
Download Code: https://github.com/Arthurwiz/ST7735-TFT-LCD-1.77-Inch
ST7735S LCD Controller Datasheet - https://www.crystalfontz.com/controllers/Sitronix/ST7735S/
Download Code: https://github.com/Arthurwiz/ST7735-TFT-LCD-1.77-Inch
 RSS Feed