Arthur Wang's Blog
Follow me on
  • My General Blog
  • Software Development
    • Latest Articles on Software Development
    • Complete Resources for Developers >
      • Tutorial Information for Developers
      • .NET Developer Blogs
      • Developer Journals and Magazines
      • Developer's Tools
      • Database Development
      • ​Developer Conference and Events
  • Tech
    • Latest Articles on Technology Development
  • Health
  • Money
  • Services
    • Modern Website Design
    • Web Maintenance of Existing Websites Service
    • Corporate Business Consulting Service
  • About
  • Contact
  • Art
  • 中文部落格

1.77 Inch TFT LCD Display with ST7735S on Arduino Mega 2560

8/25/2018

6 Comments

 
Picture

​Introduction

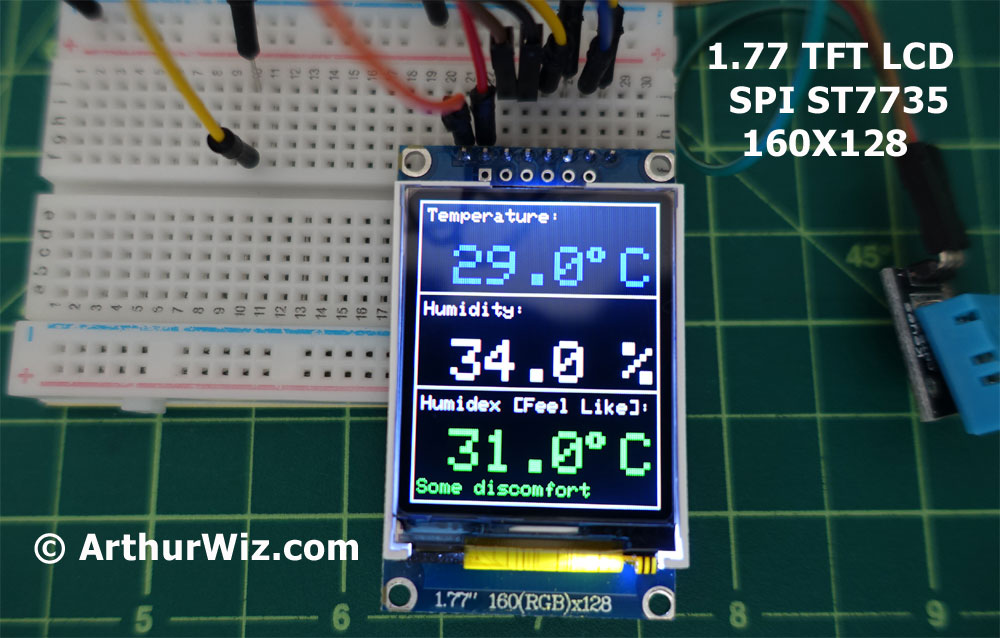
There is little information on the Internet with a combination of this 1.77 inch TFT LCD work on Arduino Mega board.  Most of the information is covering the 1.8 inch TFT LCD, and it is a little bit tricky to make this works since the connections on the board, and the code/driver may be different from other LCDs.  We use this opportunity to explain the technology behind it besides just showing the readers its schematics. Later, we'll show how to display both the temperature and humidity on the LCD with the DHT-11 sensor.

Materials

  • Arduino Mega 2560 - visit Amazon Store
  • 1.77 Inch TFT LCD with the ST7735S Controller chip
  • DHT-11 digital temperature and humidity sensor (3 PIN)
  • Half-size breadboard

How Arduino board communicates with a device?

In a simple analogy, a computer uses a computer program, device driver, to talk to hardware like a printer and in the Arduino board, there is a microcontroller also uses some drivers to communicate with the LCD device. The communication between the microcontroller and devices can be parallel and/or serial when we look at it from the data transmission level.  When we wired two LED lights with two separate I/O PINs on the board, we let the microcontroller sending the data in a parallel fashion. In the serial transmission, the data transmit one bit of data at a time, sequentially, over a communication channel called the bus. In web programming, we have the luxury of sending more complex data on a broader bandwidth, like JSON, a key-value pair data, when comparing with the low-level programming in electronics. There is a pulsing technique controlled by a clock, transmitting one bit every clock pulse.  In this way, it compensates for the narrow path for data to pass through while maintaining the understanding of who is talking to whom or how to interpret the pieces of bit information that a device receives.  With the clock speed, we can distinguish the data chunk out from the signal stream. It acts like traffic lights in the busiest city where all devices in the SPI bus shared the same clock as it maintains the data flow synchronized and controlled.  As a result, paired its data line with a clock signal, the data is transferred synchronously.  Many protocols are using this type of methods to communicate, such as SPI, and I2C.  In our case, the LCD uses the Serial Peripheral Interface (SPI) protocol to communicate with the microcontroller on the Arduino board. Just like on the Internet, HTTP is a protocol for data communication between a web server and a client computer.

The SPI enabled device typically has the following pins:
  • MISO (Master In Slave Out) – A line for sending serial data to the Master device
  • MOSI (Master Out Slave In) – The Master line for sending serial data to slave devices
  • SCK/SCLK (Serial Clock) – A clock signal generated by the Master device to synchronize data transmission, so the slave device knows when to read the input.
  • SS – A line indicating slave device selection
  • RESET - A line for restarting the transmission process.

​The sequence of the events in serial data transmission is initialized when the SS pin set low as in active mode for the slave device.  Otherwise, it simply ignores the data sent from the master or the microcontroller on the Arduino board in this scenario since all devices on the SPI bus share the MISO, MOSI, and SCLK lines and the message arrives at the slave devices at the same time. Only the devices that the master wants to communicate have its SS pin set low. During the data transmission, the master begins to toggle the clock line up and down at speed supported by the slave device.  For each clock cycle, it sends one bit on the MOSI line, and receive one bit on the MISO line. Until stopping the toggling of the clock line, the transmission is complete, and now the SS pin is returned with a high state. A reset is triggered, and the next sequence of data transmission can be started again. It looks like a controlled escalator moving people up and down in light speed!
​
In slow motion, when SS (CS) Pin is low, the ST7735S controller chip on the slave device understands that the data carried in two lines, SCK and SDA is a command from the master.  When high, the data signal is being sent from the slave to master via a register select signal called RS.

Setting Up the LCD

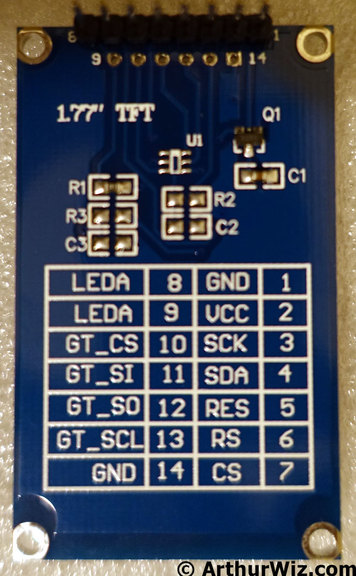
 This particular 1.77 inch TFT LCD has a 160x128 dimension, and it has 8 pins and 6 reserved holes (showing as 9 to 14) as shown below. 
Picture
Communication Pins Connections
​Arduino Pin
​LCD PIN
​Other Name
PIN Purpose
​Constructor 1
Constructor 2
3.3V
8 LEDA
Lite
​Backlight control
 
10
7 CS
Chip Select / DC (Data/Command)
SS PIN / SPI data or command selector [SS = Slave Select]
Yes
Yes
9
6 RS
​Register Selection
​MISO - Sending to Master
Yes
Yes
8
5 RES
​Reset / RST
​Reset the TFT
Yes
Yes
11
4 SDA
Serial Data
​MOSI - Sending to Slave
Yes
13
3 SCK
​SCLK - Clock Line
SPI Clock Input
Yes
5V
2 VCC
​Voltage Common Collector
GND
1 GND
Ground
Ground
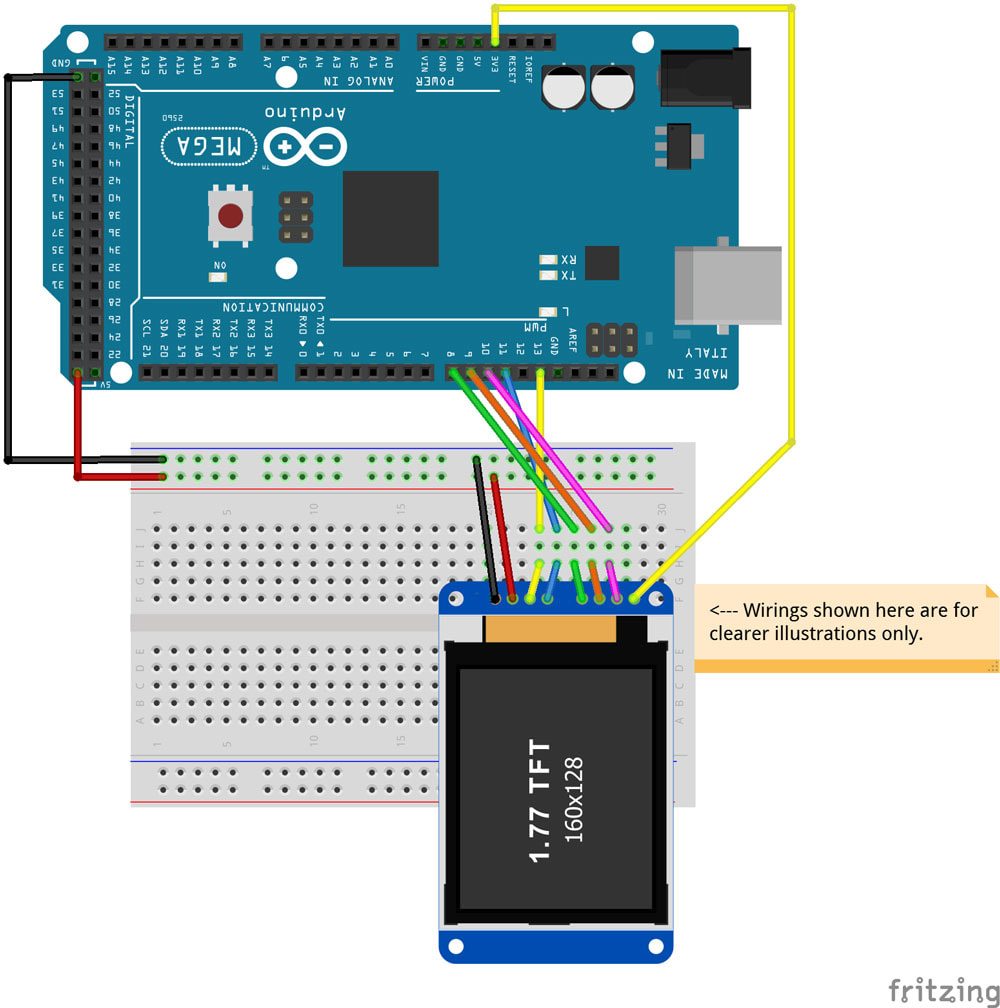
Breadboard View
Picture

Coding Time!

In the Arduino IDE, we include the Adafruit_ST7735 TFT library to control the LCD device and Adafruit_GFX library to handle graphics operation.
​
Download library:

https://adafru.it/dXk
https://adafru.it/cBB

How to install the library in the Arduino IDE: https://adafru.it/aYM

There are two constructors in the Adafruit_ST7735 class:

  1. Adafruit_ST7735 tft = Adafruit_ST7735(TFT_CS, TFT_DC, TFT_RST);
  2. Adafruit_ST7735 tft = Adafruit_ST7735(TFT_CS, TFT_DC, TFT_MOSI, TFT_SCLK, TFT_RST);
Two constructors in this class mean that there are two ways to create the tft object.  For 1.8 inch LCD, you should use the first constructor shown above. In our case, the 1.77 inch LCD requires us to use the second constructor.
To do a simple HelloWorld on the LCD to see if it works, you can use this code:
​
https://github.com/Arthurwiz/ST7735-TFT-LCD-1.77-Inch/blob/master/ST7735s_LCD_HelloWorld.ino
​#include <Adafruit_GFX.h>    
#include <Adafruit_ST7735.h> 
#include <SPI.h>


#define TFT_CS    10
#define TFT_RST   8  
#define TFT_DC    9 

#define TFT_SCLK 13   
#define TFT_MOSI 11   

//Adafruit_ST7735 tft = Adafruit_ST7735(TFT_CS,  TFT_DC, TFT_RST);
Adafruit_ST7735 tft = Adafruit_ST7735(TFT_CS, TFT_DC, TFT_MOSI, TFT_SCLK, TFT_RST);

void setup(void) {
  tft.initR(INITR_BLACKTAB);  
  tft.fillScreen(ST7735_BLACK); 
 
  tft.setTextColor(ST7735_WHITE);
  tft.setTextSize(0);
  tft.setCursor(30,80);
  tft.println("Hello World!");  
  delay(1000);
  
}

void loop() {

  tft.fillScreen(ST7735_WHITE); 
  delay(1000);
  tft.setTextColor(ST7735_BLACK);
  tft.setTextSize(0);
  tft.setCursor(30,80);
  tft.println("Hey you! You got it!");  

  delay(500);
}
​Congratulations if you see the HelloWorld test is working!

Setup for Displaying Temperature and Humidity and Humindex or the "Feel Like" scale

DHT-11 PIN
​Arduino PIN Number
S
7
​+ (Middle PIN)
5V
-
GND
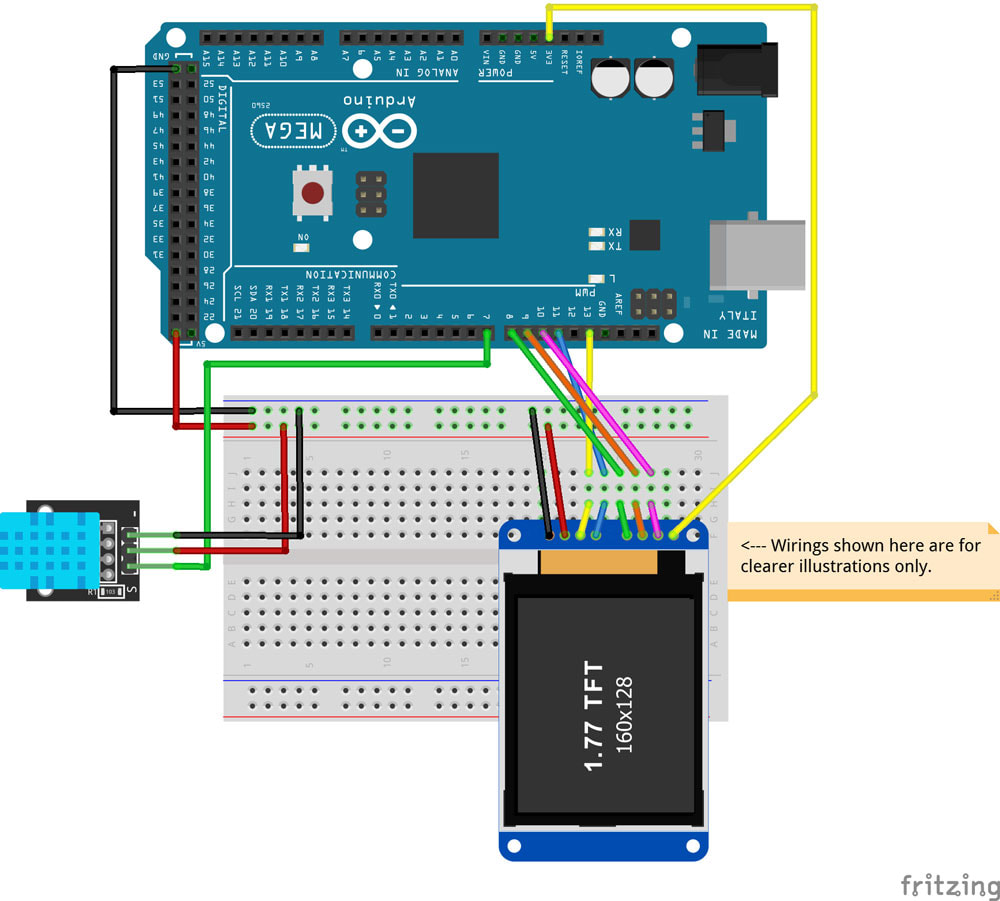
Breadboard View with DHT-11 Sensor
Picture

Here is the code for displaying the information from the sensor:
https://github.com/Arthurwiz/ST7735-TFT-LCD-1.77-Inch/blob/master/ST7735s_LCD_ThermometerSensor.ino
​#define TFT_CS 10
#define TFT_DC 9
#define TFT_RST 8
#define TFT_SCLK 13   
#define TFT_MOSI 11   

#include <Adafruit_GFX.h>
#include <Adafruit_ST7735.h>
#include <SPI.h>

#include <stdio.h>

#include <DHT.h>

#define DHTPIN 7 // DHT11 data pin is connected to Arduino 7 pin.
#define DHTTYPE DHT11
DHT dht(DHTPIN, DHTTYPE);

#if defined(__SAM3X8E__)

#undef __FlashStringHelper::F(string_literal)

#define F(string_literal) string_literal

#endif

//Adafruit_ST7735 tft = Adafruit_ST7735(TFT_CS, TFT_DC, TFT_RST);
Adafruit_ST7735 tft = Adafruit_ST7735(TFT_CS, TFT_DC, TFT_MOSI, TFT_SCLK, TFT_RST);

//Black theme

#define COLOR1 ST7735_WHITE
#define COLOR2 ST7735_BLACK

//White theme

//#define COLOR1 ST7735_BLACK
//#define COLOR2 ST7735_WHITE

int text_color_humidex;

float humidity, temperature, humidex;

String message;

void setup(void)
{
    Serial.begin(9600);
    
    // Initialize device.
    dht.begin();
    Serial.println("DHT Sensor Initalized");

    tft.initR(INITR_BLACKTAB); // initialize a ST7735S chip, black tab
    tft.fillScreen(COLOR2);
}

void testdrawtext(char* text, uint16_t color)
{
    tft.setCursor(0, 0);
    tft.setTextColor(color);
    tft.setTextWrap(true);
    tft.print(text);
}

void loop()
{
    // get data from DHT-11
    humidity = dht.readHumidity();

    temperature = dht.readTemperature();
    Serial.print("humidity:   "); Serial.println(humidity);
    Serial.print("temperature:   "); Serial.println(temperature);

    //humidex is calculated
    humidex = calculate_humidex(temperature, humidity);

    // Table
    tft.drawRect(0, 0, 128, 160, COLOR1);
    tft.drawLine(0, 50, 128, 50, COLOR1);
    tft.drawLine(0, 100, 128, 100, COLOR1);

    // data is outputed
    temperature_to_lcd(temperature, 4);
    humidity_to_lcd(humidity, 55);
    humidex_to_lcd(humidex, 105);
}


// outputs temperature to LCD

void temperature_to_lcd(float temperature, unsigned char text_position)
{
    int text_color;
    tft.setCursor(4, text_position);
    tft.setTextColor(COLOR1, COLOR2);
    tft.setTextSize(1);

    tft.print("Temperature:");
    tft.setTextSize(3);
    if (temperature > 0)
    {
        text_color = ST7735_BLUE;
    }
    else
    {
        text_color = ST7735_BLUE;
    }

    tft.setCursor(1, text_position + 20);
    fix_number_position(temperature);
    tft.setTextColor(text_color, COLOR2);
    tft.print(temperature, 1);
    tft.setCursor(108, text_position + 20);
    tft.print("C");
    tft.drawChar(90, text_position + 20, 247, text_color, COLOR2, 2); //degree symbol

}

//outputs humidity to LCD

void humidity_to_lcd(float humidity, unsigned char text_position)
{
    tft.setTextColor(COLOR1, COLOR2);
    tft.setCursor(4, text_position);
    tft.setTextSize(1);
    tft.println("Humidity:");
    tft.setTextSize(3);
    tft.setCursor(1, text_position + 20);
    fix_number_position(humidity);
    tft.print(humidity, 1);
    tft.print(" %");
}

//outputs Humidex to LCD

void humidex_to_lcd(float humidex, unsigned char text_position)
{
    tft.setCursor(4, text_position);
    tft.setTextSize(1);
    tft.println("Humidex [Feel Like]:");
    tft.setTextSize(3);

    tft.setCursor(1, text_position + 17);

    if ((humidex >= 21) && (temperature < 44))
    {
        fix_number_position(humidex);

        get_humidex_color_warning_message(humidex);

        tft.setTextColor(text_color_humidex, COLOR2);

        tft.print(humidex, 1);

        tft.setCursor(108, text_position + 17);

        tft.print("C");

        tft.drawChar(90, text_position + 17, 247, text_color_humidex, COLOR2, 2); //degree symbol

        tft.setCursor(3, text_position + 43);

        tft.setTextSize(1);

        tft.print(message);

    }
    else
    {
        tft.print(" --.-");

        tft.setCursor(108, text_position + 17);

        tft.print("C");

        tft.drawChar(90, text_position + 17, 247, COLOR1, COLOR2, 2); //degree symbol

        tft.setCursor(1, text_position + 43);

        tft.setTextSize(1);

        tft.println(" ");

    };

}

// aligs number to constant position

void fix_number_position(float number)
{
    if ((number >= -40) && (number < -9.9))
    {
        ;
    }

    if ((number >= -9.9) && (number < 0.0))
    {
        tft.print(" ");
    }

    if ((number >= 0.0) && (number < 9.9))
    {
        tft.print(" ");
    }

    if ((number >= 9.9) && (number < 99.9))
    {
        tft.print(" ");
    }

    if ((number >= 99.9) && (number < 151))
    {
        tft.print("");
    }
}


// Pass 8-bit (each) R,G,B, get back 16-bit packed color
uint16_t Color565(uint8_t r, uint8_t g, uint8_t b)
{
    return ((r & 0xF8) << 8) | ((g & 0xFC) << 3) | (b >> 3);
}

//function to calculete Humidex

float calculate_humidex(float temperature, float humidity)
{

    float e;

    e = (6.112 * pow(10, (7.5 * temperature / (237.7 + temperature))) * humidity / 100); //vapor pressure

    float humidex = temperature + 0.55555555 * (e - 10.0); //humidex

    return humidex;

}

// Setting text color and message based on Humidex value

void get_humidex_color_warning_message(float humidex)
{

    if ((humidex >= 21) && (humidex < 27))
    {

        text_color_humidex = Color565(0, 137, 0);

        message = "No discomfort ";

    } // dark green

    if ((humidex >= 27) && (humidex < 35))
    {

        text_color_humidex = Color565(76, 255, 0); // light green

        message = "Some discomfort ";

    }

    if ((humidex >= 35) && (humidex < 40))
    {

        text_color_humidex = Color565(255, 255, 0);

        message = "Great discomfort ";

    } // yellow

    if ((humidex >= 40) && (humidex < 46))
    {

        text_color_humidex = Color565(255, 140, 0);

        message = "Health risk ";

    } //light orange

    if ((humidex >= 46) && (humidex < 54))
    {

        text_color_humidex = Color565(221, 128, 0);

        message = "Great health risk ";

    } //dark orange

    if ((humidex >= 54))
    {

        text_color_humidex = Color565(255, 0, 0);

        message = "Heat stroke danger ";

    } // red

}

Conclusions

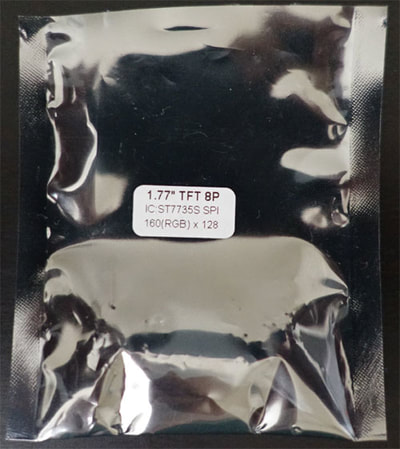
I hope this article helps you set up the 1.77 inch TFT LCD successfully. Sometimes it is difficult to know which library to use when your manufacturer does not provide you with anything else except this label on the package. Remember to make sure that the background and text colors must be different to display characters or else you cannot see anything.
Reference
​
​ST7735S LCD Controller Datasheet - https://www.crystalfontz.com/controllers/Sitronix/ST7735S/
Download Code: https://github.com/Arthurwiz/ST7735-TFT-LCD-1.77-Inch

6 Comments

Your First Step to Deep Learning in Machine Learning

3/6/2018

0 Comments


Unlocking the Mystery of Machine Learning

Picture
​Before we dive into defining these buzz words like Machine Learning and Deep Learning in the technology field, let’s first describe some scenarios in the real world. By understanding of how our brain works in recognition process may shed some light on what machine learning means and how it works.
​
Imagine you are one of the volunteers in a big organization where members are often working together for more than one project in a year. In one project, you may work with the same set of volunteers, and on the other project, you work with another set of people, and for other projects, people may be mixed from other projects. If I bring all the people from a specific project and put them in a room, without telling you the project name, can you guess what project it is?
If you say, “Of course!” then you may already at the door of understanding what Deep Learning is.  Let’s try to break down the steps of how you come up with identifying the specific project by just looking at the people in the room.
​Here is a possible pathway of the steps that you may use to identify the project:
1. You recognized the name of each person in the room.

2. Analyze the data you obtained from step 1 to see if there is any apparent patterns or clues to help us identify the project these people were involved.  A pattern can be established by looking at the unique combination of certain people in the group. For example, person A, B, C are always do some specific work in the group, and this pattern gives you a clue. [See the graphic for this article as shown at the beginning of the article] Or there may be some clues that you may be used to eliminate the possibility of other projects. There may be some people who stand out than others because you remembered an event happened in the past and this helps your identification in later steps.

3. Lastly, the project name is identified, and you recall all the names who were involved in that project as a confirmation check. A conclusion is reached at the end.

When we break down our thinking process, we realize that these are the steps taken to reach our conclusion and it is a process of recognition used in our brain for this scenario.  For a machine, we implement a set of algorithms that are similar to our thinking process described above to assist it to come up with a conclusion. The buzz word like “Deep Learning” is just a set of machine learning algorithms that accomplish the data analysis and attempts to come up with a significant clue or conclusion using a variety of techniques includes but not limited to the previously learned data or findings. One of the Deep Learning techniques used in machine learning is called Convolutional Neural Network (CNN), and it is popular in analyzing visual imagery.
​In this article, I will attempt to use the scenario we discussed earlier to describe the similar steps taken in the CNN. Unlike a typical explanation of CNN, I do not want to use visual imagery to describe the CNN because I want you to visualize the process in the head instead of using our eyes to do the recognition. In this way, you can get the feeling of how the machine “sees” the image without the eyes.
​

In the CNN, it has sequential processing steps just like our analysis steps shown previously, but it also has techniques that process in parallel just like our step #2 where we tried a few ideas at the same time. In machine learning, each step or a technique is called a layer. Inputs are passing through different layers to come up with some significant clues or intermediate results and pass down to next layers, and they end up with a definitive prediction about the thing it tries to recognize.  For example, in the CNN, the initial data was passed through the Convolutional layers. Within the Convolutional layers, you have other layers like Pooling, Fully Connected layers, and their ultimate goals are to break down the initial data into significant pieces that can be learned or processed. In comparison with our scenario, in the beginning, we have the individual person in the room, and everyone was identified with a name, and this is similar to the idea of how these layers assist the machine in coming up with pieces that are workable in later steps. ​
There four main layers in the CNN, such as Convolution, Subsampling, Activation and Fully Connected.

Step 1: Convolution

In this step, the network of the layered structure is established, and the input data was breakdown into input signals where each signal was labeled according to convolution filters.  At the end of passing the filter, it analyzed the input against from some reference points learned in the past occurrence. The resulting output signal was then passed on to the next layer to be processed. This is similar to our first step where each individual is a workable piece of information and we used our memory to identify each from the room and label each person with a known name.

Step 2: Subsampling

In this step, we tried to get some kinds of the resolution out from the outputs of the previous layer as our inputs for this step, which means that some inputs become less significant and some inputs become more significant after this Subsampling phase. As a result, we can see the variations and noise through this process. For example, in our scenario, we may identify some connections on certain people in the room which are more popular since they may be more active in other projects and a certain smaller group of people was more active in certain projects. This finding gave you a clue in which you can use to eliminate certain projects from the project list. From your unique recollections, there were people who just more stand out from the room because of memory you had from some activities. This phase of process gave us a resolution of the overview.

Step 3: Activation

In this step, we begin to identify a pattern from our previous clues. Let say person A, B, C are in one group, and person X, Y are in another group. [See the graphic for this article as shown at the beginning of the article] The combination of these two groups of people in the room indicates this project may be involved in a specific type of projects. The strong signal output becomes activated or stands out from the crowd as it is strongly associated with past references and this gives you a stronger claim in supporting the identification of the project we try to do.

Step 4: Fully Connected

In the last step, the layers in the network are fully connected, and strong pattern of connection or links emerge as shown in Step 3 in our scenario where the project has a combination of groups of ABC + XY +…..n patterns. This unique pattern greatly helped the identification and reached a final decision. The final result may be right or wrong, but at least it has come to a possible conclusion with some reasoning behinds it.
​
The CNN may also add another step called the loss layer where it involves training of the neural network and tries to reinforce the right concepts as it trains and guess how far off from the correct identification. The result of this layer can be stored and used for the next batch of processing as a base experience when it needs to do for the subsequent recognition process.
​
In this article, I hope you have gained some basic understanding of Machine Learning and how Deep Learning is applied in assisting machine to do recognition and learning in this exciting area of technology.   In the next article, I want to do a hands-on coding in creating a deep neural network using Microsoft solutions.  
0 Comments

Are You Ready to Tap into the Power of Bing Cognitive Service API?

1/22/2017

0 Comments

 
As we are moving toward to the Microservice architecture era, Microsoft has been developing a suite of APIs that let developers consume and use its cognitive technology.  It allows you to build powerful apps using just a few lines of code regardless of what device and operating system your app hosts.  In the latest suite of Bing’s Cognitive Services APIS, it includes five areas: Vision, Speech, Language, Knowledge, and Search.  Despite that the Search service is similar to old Microsoft Search API that released 10 years ago, other services have been just developed within one to two years which are now available on Microsoft’s Azure portal.
Picture
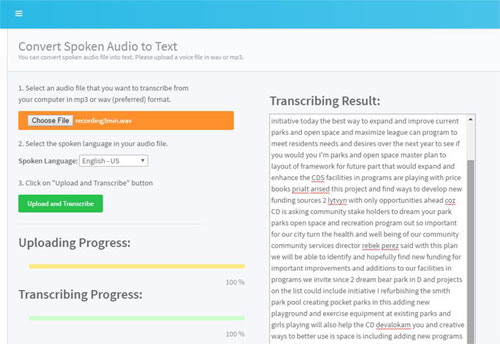
Recently, I have the opportunity to develop a Speech-to-Text web application using the Bing Speech API.  My web application allows the user to upload an audio file in .wav format and by selecting the locale of the audio, the Speech To Text API is capable of recognizing the audio and returns the result of transcribed text and displays it on the web page.  You can find the official documentation for Speech Recognition service from here.
​
Before you start researching and reading about the documents, please note there are many documents and sample projects used the api.projectoxford.api endpoint, and this endpoint is retiring on January 17, 2017, and you should use speech.platform.bing.com endpoint instead.  
There are 3 types of Speech Recognition library: REST API, Client Library, and Service Library.  You should only choose one of them. Since I was developing a web application, I used the REST API and this means that I only get one result per request. For Client Library, it allows real-time streaming and returns partial recognition. In this way, the code must be written on the client side and request directly to the service directly. This is great for writing for the app for mobile devices. Lastly, the Service library also allows you to request the partial result and is great for Windows apps. 
 
In the REST API library, I wish the documentation can be written by someone other than the developers who involved with the cognitive service because many things are not that clear unless you become experience with it.  For example, “Your application must indicate the end of the audio to determine start and end of speech….” So how do you indicate the end of the audio?  How about say “The End” in the voice audio?  No, I think I’ll assume a short moment of “no voice” or quite which indicates the end of audio.  In this API, you should break your audio file into segments, and send each segment to the REST API to process it.  Each segment is a complete .wav file, not bytes chunk, and it has a limit of 10 seconds of audio in one request. This means that each length of speech needs to be less than 10 seconds. I used 9 seconds for my app, or else you will see the unserviceable error.  The duration of this request cannot exceed 14 second of processing time, which means that the API will abort itself once it exceeds that limit.

The sample code provided by Microsoft can be found here.  In my web application, I used the latest System.Net.Http. HttpClient class, instead of HttpWebRequest class shown on the sample to connect the API service. But before you made the switch, you should be familiar with asynchronous programming especially if you are building your own Web API pipes for your web applications. 
var client = new HttpClient();
var token = MicrosoftAuthentication.GetNewToken();
client.DefaultRequestHeaders.Add("Authorization", "Bearer " + token);
client.DefaultRequestHeaders.TransferEncodingChunked = true;
client.BaseAddress = new Uri(requestUri);
var response = await client.PostAsync(requestUri, fileContent).ConfigureAwait(false);
​At this time of writing, the Bing Speech API is still in beta, and from my experience, it is still rough, but I feel the time for prime use is near.  Now is a good time to get your feet wet with the Cognitive technology from Bing.  

Below is a snapshot of my web application that I developed:
Picture
0 Comments

Use Katana OWIN OAuth 2.0 to Secure your API Connection and Authentication Plus Refresh Token for .NET Developers

12/21/2016

0 Comments

 
Picture
In this article, I’ll be showing you how to use OWIN 2.0 specification to secure ASP.NET Web API v2 from scratch. If you are looking for a token-based authentication and dual authorization based on claims or finding a way to have an independent self-host without using the IIS security architecture, then this article is for you.
​

There are tons of information and sample codes out there in the wild, but with the rapid pace of advancement in technologies over the year, many sample codes become old or not working anymore. I feel the results from the search engines were like archeological sites that contain different things from different eras. One has to sort it out to reason it.  Since time flies quickly, this article will be outdated one day as well and be dumped into one of these archeological sites just like the others, but I’ll show you exactly what technologies I used to build the sample codes in details. We're going to build the latest token-based authorization / authentication for modern apps that are self-host and .NET focused solution.  The objective is to show you how OAuth 2.0 authorization work from requesting the access token and use it to access protected API and then see the refresh token in action. Many security practices have omitted and we only show you the minimal code to achieve our objective and it cannot be used in the production environment as is. I assume you will do your own database and security strategies.  Lastly, we will also show you how to use tool to communicate with our OWIN/OAuth solution and develop a simple console to interact with the host.

Is it just me?

There are many confusions in the internet describing a simple OWIN working solution. Many samples contained old technologies and mixed with other infrastructure like data model and other unnecessary components to make it work. The OAuth/OWIN technology is somewhat simple and elegant, but the learning experience could be frustrating if you are new.  It seems like some people on the internet purposely try to confuse you so they can sell you a paid service to do an OAuth solution? Never mind the conspiracy theory, before we dive into details, it is imperative to know a few things to see the big picture of how OWIN and Katana can help us to build our solution.

What is OAuth 2.0? ​

OAuth 2.0 is a protocol that is independent of Microsoft, and it provides an authorization framework that enables communications between two or more independent HTTP services like Web API. Many open source communities and vendors like Microsoft develop their own OAuth 2.0 solutions based on this specification.  The specification describes how a requestor requests for an access token from the authorization server, and what keys and values needed for its submission through a POST action via HTTP and the policies on how the authorization server should respond to the request.
One of the confusions about learning the OAuth or OWIN is not because of the OAuth itself but because of its flexibility.  Great flexibility is sometimes not a good thing for beginners. Many components are created to work interchangeably in the OAuth framework, and many such components are open source with different names.  By looking at the names themselves, one cannot comprehend its role in the framework.  In this paper, we will be focusing on the Microsoft’s solution on OAuth.

Order your dinner to go tonight?

If you still have problems of understanding them at this point, let me put them in some analogies.  OAuth is just like a dinner, where Microsoft’s OAuth is like Japanese Food, and katana is like the Terri Chicken with Shrimp Tempura.  So you could have Mexican Food or Chinese Food for your OAuth dinner.  There are many mixed combinations of components to create your own special dinner. I apologized if I further confused you, but please continue reading and keep these analogies in mind.

OWIN for .NET Developers

Microsoft creates an open standard called Open Web Interface for .NET or known as OWIN, and the actual implementation of the OWIN is called Katana. 
For examples, just for OWIN itself, there are names like Katana, Nancy, Jasper, Suave, Nowin, ACSP.NET, Freya, ASP.NET Web API, ServiceStack, HttpListener, and the list can go on and on. Some components are deprecated, and some belong in one of these components: Host, Server, and Middleware. 
Katana is a collection of OWIN-compatible components that make the whole architecture. Our perceptions about host and server have changed.  You should think Server and Host as functional components that serve other components in the architecture, rather than hardware server or IIS web server.  The Host manages the whole environment from initiating to launching the process. An example of the server will be the authorization server that takes care of authorization and granting token at the end.  The Middleware contains layers of various frameworks that manipulate the ins and outs of the properties in the pipelines. Each framework can be a function or act as a smaller application for a complex need, or this bare framework can be just a simple DelegatingHandler or a special Func Dictionary.  
using AppFunc = Func<IDictionary<string, object>, Task>; // Enviornment data in dictionary and Task done
app.Use(ctx, next) => { await ctx.Response.WriteAsync(“<html><head></head><body>Hello guys!</body></html>”) }); 
where ‘app’ is the IAppBuilder in the Configuration() and ctx is the OwinContext(environment) and ‘next’ is AppFunc. 
The additional setting in the HttpConfiguration object will be the last step or layer of the middleware.
Fortunately, with Katana, we don’t need to write a lot of codes. When you install the System.Web.Http.Owin assembly, you can use UseWebApi method derived from WebApiAppBuilderExtensions class to complete our pipeline by binding middleware together. Because of the Web API’s host adapter design, it allows components to be arranged in a pipeline structure and allows decoupling of other components so every component in the Middleware can perform different tasks in a request or response.  With an optional ‘scope’ properties, the developer can further scope certain APIs or Middleware layers to smaller tasks. 
​

   var config = new HttpConfiguration();
   app.UseWebApi(config);
​

Please note that all methods used in the Middleware are all asynchronous task-based method. If there an error has occurred, it should immediately return an error response to the caller rather than continue to the next pipeline.  The implementation of OWIN assumes that the communication is over an SSL/TLS connection. So we only set   AllowInsecureHttp = true in the development environment when we are setup the OAuthAuthorizationServerOptions portion of the codes.   

Let's start coding Katana

You need to have at least Visual Studio 2013 or above to build this project.  We are going to create two separate solutions, and each solution is going to have one project.  One project is for making the Host, and the other project is for building the Client. Now let’s create the Host project.
Project 1: Create AW Katana Self Host Server
The purpose of this project is to create a self-host server with katana OWIN spec that is minimal for grant requestor access token and process refresh token without the database.
​
Visual Studio 2015 Community Version
Project Type: Windows Console Application with .NET Framework 4.5.2
Project Name: AWkatanaSelfhost
Package Install:
Microsoft.Owin.Host.Systemweb
In Package manager console:
PM> Install-Package Microsoft.Owin.Host.Systemweb
Install-Package Microsoft.AspNet.Identity.Core
Install-Package Microsoft.AspNet.Identity.Owin
Install-Package Microsoft.Owin.Security
Install-Package Microsoft.Owin.Hosting
Install-Package Microsoft.AspNet.WebApi.Owin
Install-Package Microsoft.Owin.Host.HttpListener
 

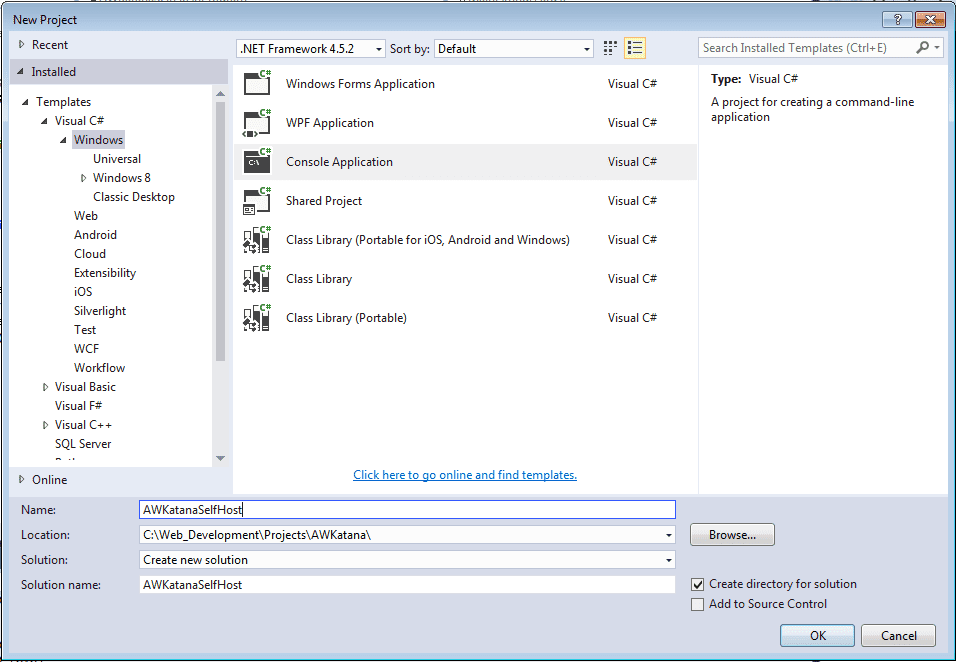
1. Create a new project, Select Console Applicaton with .NET framework 4.5.2
Picture
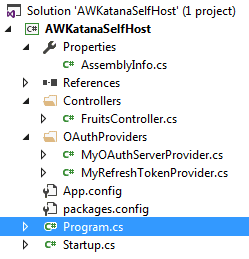
2. Create two folders: Controllers and OAuthProviders
Picture
3. Open Program.cs file, and we will build a self-host web server in here. By using Microsoft.Owin.Hosting, you can add WebApp object in it and instruct the host to start the application from Startup class, which we will be building in the next step.
        static void Main(string[] args)
        {
            string baseUri = "http://localhost:8000";
 
            Console.WriteLine("Starting web Server...");
            WebApp.Start<Startup>(baseUri);
            Console.WriteLine("Server running at {0} - press Enter to quit. ", baseUri);
            Console.ReadLine();
        }
​
​4. Create a class called “Startup.cs” and inside of this file, add two references: System.Web.Http and Microsoft.Owin.  This is the place where we are building the OWIN with Katana component architecture. Using Microsoft’s OWIN IAppBuilder at the first method called configuration, we can build the OWIN HTTP pipelines.  There are just 3 separate tasks to build it. One is to configure the IAppBuilder app by supplying it with information like the token path and provider and custom options for Authentication pipeline since we are going to build our own token and refresh token. Second is to map the route of our resource. The third task will be bring the route information from the HttpConfiguration into the last pipeline.
​
        public void Configuration(IAppBuilder app)
        {
            ConfigureAuth(app);
            var webApiConfiguration = ConfigureWebApi();
            app.UseWebApi(webApiConfiguration);
        }
 
5. Create MyOAuthServerProvider class in the oAuthProviders folder.  This class is the brain of the entire architecture, where it validates the incoming credential against the security data we have on the server.  First, it analyzes the incoming data and determines if this is a new requestor for the access token or a return requestor who requests the renewal access token by using the refresh token. The ValidateClientAuthentication method will decipher the incoming data and determine the next action.  If it receives user and password and the grant type is password, it will pass to GrantResourceOwnerCredential method for further verification and will determine to grant an access token or reject to the requestor. If it receives refresh token and the grant type is refresh_token, then the GrantRefreshToken method will receive the call from the ValidateClientAuthentication method, and then it will issue a brand new ticket containing the new access token when it is validated. 

6. Create MyRefreshTokenProvider class.  This class is self-explanatory where we implement the IAuthenticationTokenProvider interface from the OWIN.Security.  Here we can customize our refresh token.  In our project, we just create it as GUID data type. 

7. Create a simple API called FruitController as our resource where the requestor can access our secret Fruit List after their credential has been verified and use the obtained token to access the API.  There is no need to pass the username and password again when accessing the protected resource.  The API can be protected by simply using the [Authorize] attribute in front the controller or individual method.
​
The Self-Host project is now completed with 7 simple steps.

​The Secret Recipe of Refresh Token

Many articles and code samples explaining the OWIN usually stop at how to generate the access token and did not reveal the mechanism of how the refresh token work in codes.  The trick is not in the MyRefreshTokenProvider, but rather, it’s in the MyOAuthServerProvider class.  The OWIN’s specification said the only required parameters are “grant_type” and “refresh_token” like showing below:

   grant_type: refresh_token
   refresh_token: 3a3aebea-4150-4850-8e37-ace1d9eead9a [this is our sample and you may have other format]

There are many ways to accomplish the same thing, but in our project, the trick is to have another authentication property called “as:client_id” hidden in the original ticket when the requestor requested for the first time.  When the return requestor comes again with the refresh token and asks for a new access token, the ValidateClientAuthentication method can verify the clientId and clientSecret against the original ticket so that we are sure that this requestor is the original requestor.   Without this trick, the GrantRefreshToken method will never receive the call even the grant_type and refresh_token parameters have been passed in. A generic error message, such as “invalid_grant” can be resulted, and you may not know why.
Project 2: ​Create AW Katana Client
This Client app will be the requestor for the AW Kantana Self-Host.
Create another .NET console project in another Solution, and we are going to build the Client that requests the access token to access the protected resources.
​
Project Type: Windows Console Application with .NET Framework 4.5.2
Project Name: AWkatanaClient
Package Install:
PM> Install-Package Microsoft.AspNet.WebApi.Client

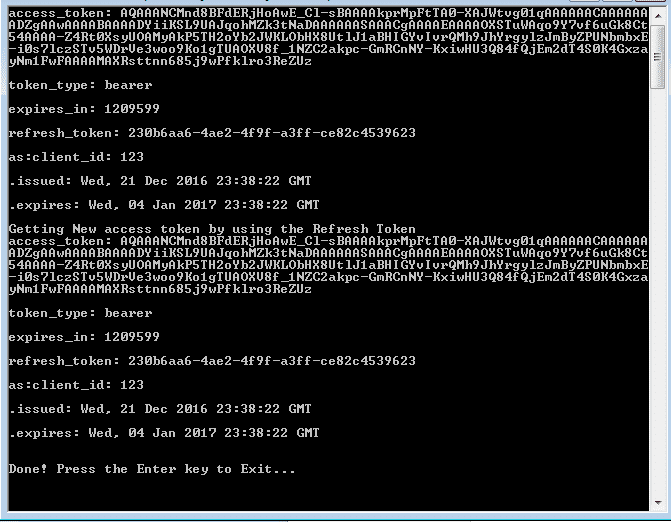
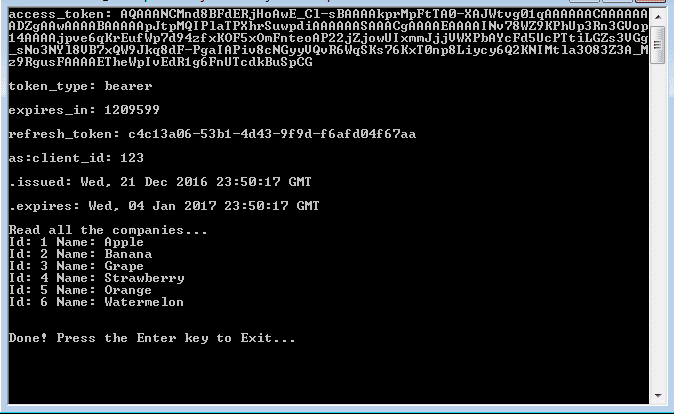
I’ve created two separate methods in the Main(). One is to demonstrate how refresh token works, and another method demonstrates how to access protected resource.  You can comment out one of them to examine the mechanism of token generation and consumption.  Please run the AWKatanaHost project first and then AWkatanaClient later in order to have a correct testing experience. See the results below:
Picture
Picture

​How to use Postman to test your Katana Host?

Postman is a tool that you can install or add to Chrome as an add-in.  Basically, Postman acts as a client that passes an HTTP POST with your desired parameters in the header and body to the host.  Before you use the tool, you need to have a solid understanding of how client-server communicates.  The communication is made possible because of HTTP protocol contains rules and information in their request/response body which dictates how client like the browser to behave and how the server should handle.  To test our AWkatanaSelfhost project, we need to use “POST” instead of the “GET” action. Download Postman

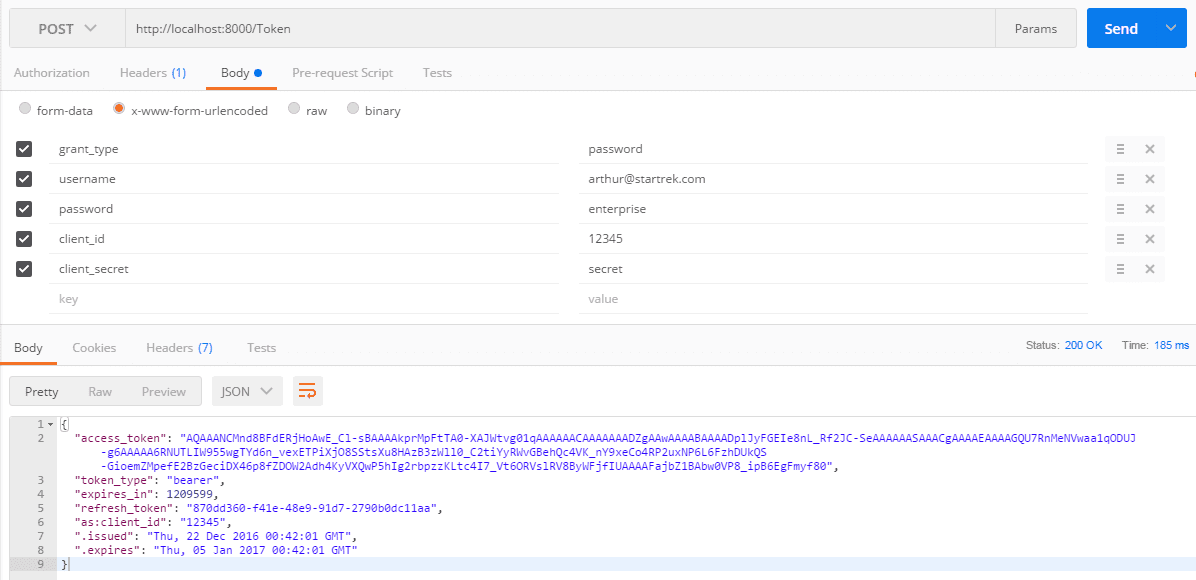
​How to emulate a client requests for the access token for the first time?

​1. Change to “POST” from the drop down list
2. On the url text box: http://localhost:8000/Token
3. Click on “Body” tab, and ignore “Authorization” and “Headers” tabs
3. Select radio button: application/x-www-form-urlencoded
4. Add the following keys and values
grant_type: password
username: arthur@startrek.com
password: enterprise
client_id: 12345
client_secret: secret
5. Click on the “Send” button
Picture
Emulating a client requests for the access token for the first time

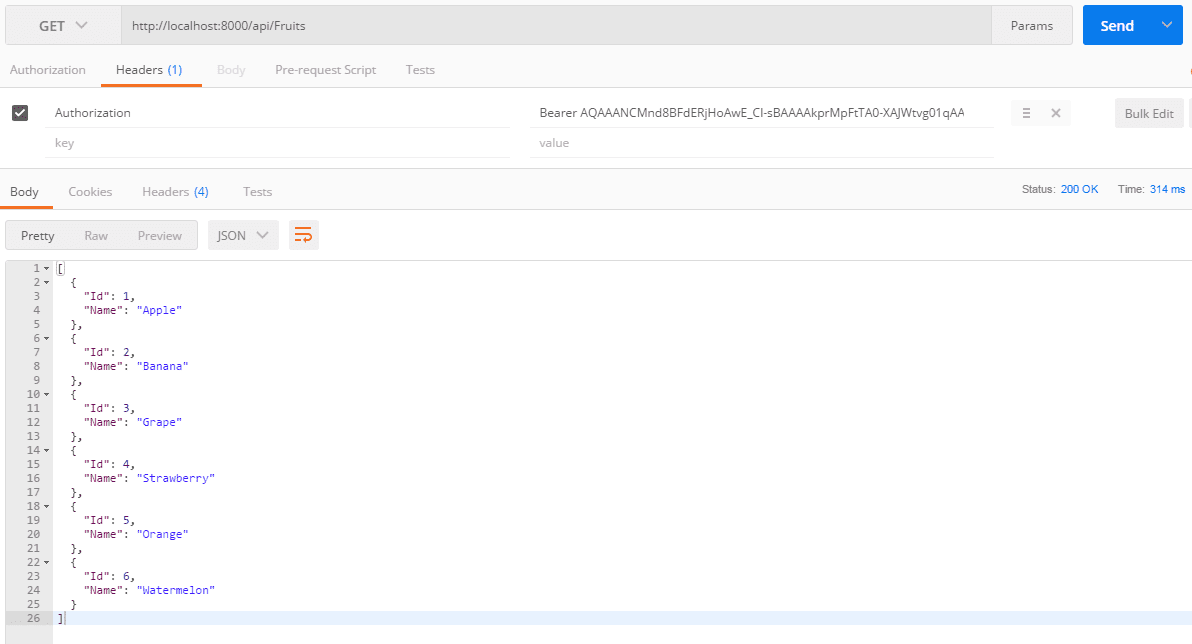
​How to emulate a client to access the protected resources?

​1. Copy the access_token value from previous response body [yes, the whole thing; 3 lines]
2. Create another tab and change to “POST”
3. On the url text box: http://localhost:8000/api/Fruits
4. Click on “Headers” tab, and put this key and value [Remember: in headers and NOT in body]
Authorization: Bearer AQAAANCMnd8BFdERjHoAwE_Cl-A..<---your access token code here
5. Click on the “Send” button
Picture
Emulating a client to access the protected resources, ../api/fruits

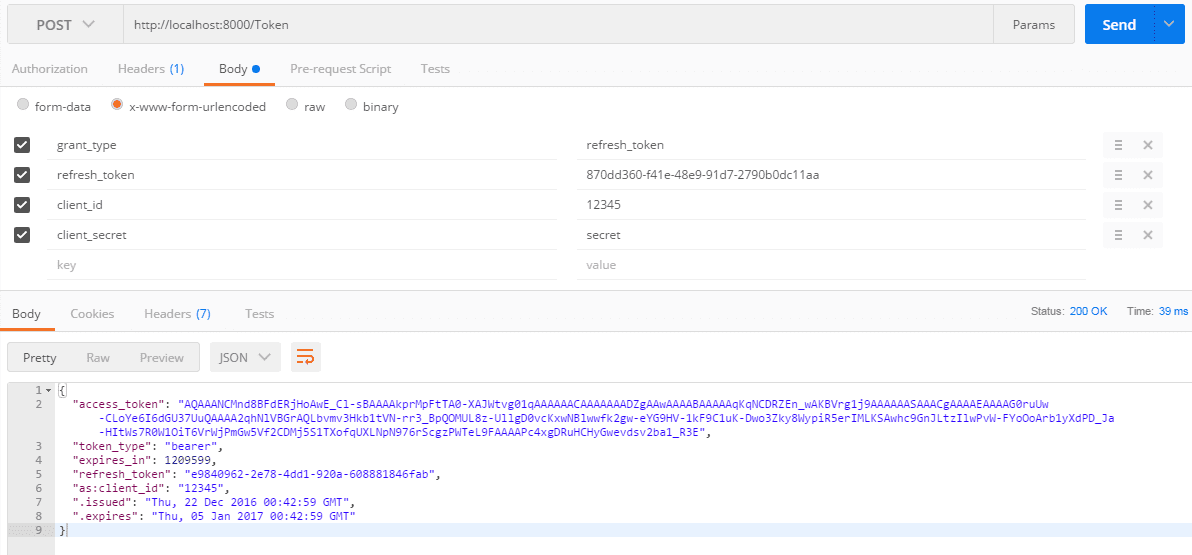
​How to obtain the new access token from your refresh token?

​1. Copy the refresh_token value from the first response body [e.g. 870dd360-f41e-48e9-91d7-2790b0dc11aa]
2. Create another tab and change to “POST”
3. On the url text box: http://localhost:8000/Token
4. Click on “Body” tab, and put this key and value
grant_type: refresh_token
refresh_token: 870dd360-f41e-48e9-91d7-2790b0dc11aafrom step #1
client_id: 12345
client_secret: secret
5. Click on the “Send” button
Picture
Emulating how to use your refresh token to obtain the access token again

Summary

I hope this article is fun and helpful for you to learn to use OAuth 2.0 to secure your API services by using Katana.  You can download the codes from here:
  • AWkatanaSelfhost
  • AWkatanaClient

​Useful Links
Postman Tool - https://www.getpostman.com
OAuth 2.0 Official Standards- https://tools.ietf.org/html/rfc6749#section-4.3.2
0 Comments

Taming the Wild Wild Web Development Tools like NPM, Bower, Gulp, Grunt and Node with Visual Studio 2015

5/26/2016

0 Comments

 
Picture
​If you are new to Visual Studio 2015 and wonder why all these external web development tools, such as Bower, NPM, or Grunt, were included in the new Visual Studio, then this article is for you.  There are tons of articles written on how to use specific tools and recommendations on which one is better than others.  In this article, we want to try to describe the ecosystem of these modern web development tools in a big picture and how tools have become complicated over time.  The quick and straightforward examples shown here will help you to get started with these tools and understand the reason behinds.

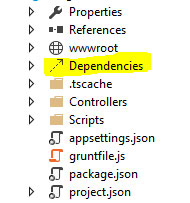
As the ASP.NET developers, we are used to having .NET Framework version upgrades and additional features like NuGet Package Manager and more whenever a new version of Visual Studio comes out.  But this time is not like that. The familiar folder structure is gone, and the web.config file is gone. The folder structure is quite different. There is even a ghostly “Dependencies” folder which appears in the Visual Studio Solution Explorer but not in the physical folders and there are unfamiliar default files [See figure below]. People even seem to move away from using Web Essentials, the Visual Studio Extension, which was a way to use the external tools outside of Visual Studio.  And even the use of NuGet Package Manager is discouraging, and instead, we are seeing more command line tools flourishing in the web development landscape as it seems like we were going backward to early DOS age after all these years of advances.  Are we going back to square one and what’s going on?
Picture
Showing Solution Explorer in Visual Studio 2015
To understand this, we must look at from the web development ecosystem perspective and cannot just look at Visual Studio itself or thought that Visual Studio just want to add some newer tools like NPM or Node.js into their product. We must recognize first that the software development as a whole is now undergoing a rapid growth phase.  New tools or upgrades are coming out on a weekly or even daily basis.  We have never seen such fast pace in the web development when comparing in the past years.   From staying competitive from a product perspective, Visual Studio needs to acquire new external tools and adopt latest web development trend to modernize its product and maximize the number of users. 

Moving away from NuGet

As the Visual Studio users, we are used to let NuGet manage our dependencies, and there is no doubt that it was a great tool.  However, NuGet is gearing toward for the Microsoft .NET ecosystem, and not all client-side libraries are submitted to the NuGet repository.  The Visual Studio users may cut from the outside world and unable to obtain the latest packages or new technologies.  As a result, Visual Studio needs to align itself to adopt the thriving development community. They do not have the resource to chase the trend and reinvent the wheels.  With the time constraint, Visual Studio still finds ways to integrate these new tools into the web development.
 
There are two popular package managers, Bower and NPM, tend to replace the NuGet tool, at least for the non-.NET component such as JavaScript or CSS.  You just need to choose one or both to manage your dependencies. NPM can be used for both server-side node packages and client-side packages.  Bower is more popular client side package manager..

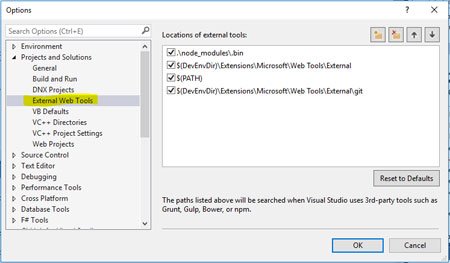
If you use Visual Studio 2015, NPM, Bower will be installed by default.  And you can manage these tool versions from Tool --> Options --> Project and Solutions --> External Web Tools  
Picture
​This list shown on the right from the Option window tells Visual Studio where to find dependencies starting from top to bottom. So the Visual Studio program looks for node_modules\bin folder from your project first, and if it cannot find it, it will look for the folder under C:\Program Files (x86)\Microsoft Visual Studio 14.0\Common7\IDE\Extensions\Microsoft\Web Tools\External and so forth.
​If you do not use Visual Studio, then you need to install them yourselves in this order.
1. Install node.js from nodejs.org, and it will also install npm by default
2. Install with a command line to install bower by using npm [npm install bower –g]
3. Install Git by using http://msysgit.github.io/  and use Git to download packages from GitHub.  

​Where are the confusions?

​For Windows users, we are so used to have no-brainer installation in the Windows environment.  Just double click and install. But to install a web development tool without Visual Studio 2015, there are so many steps just to install these tools, and we have not even talked about how to use them yet.  Life is easier in Visual Studio 2015.  Before we talked about how to use them in VS 2015, let’s compare Bower and NPM since they are doing the similar things like package managers, but it really dependent on your needs.  For example, if you need to keep two versions of jQuery in the production, then you need to use NPM, but if you need only one single copy of jQuery, you should use Bower since it just installs the designated version packages that you specified. So initially NPM is used for installing Node.js modules, and Bower.js is leaning toward on the use of managing the front end components like CSS, JS, etc. 

Here is how npm works:
 
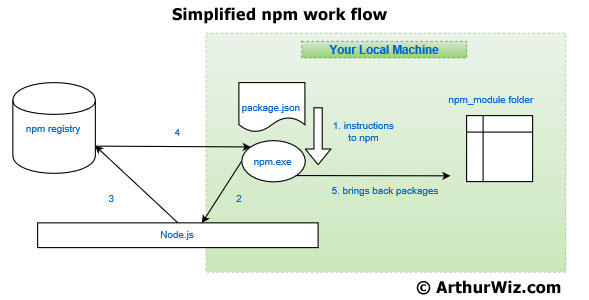
There is a registry on the internet (npmjs.org) where tool developers can publish their works, and it is powered by the CouchDB database.  Once you installed the node.js on your local machine, from a command line, you can invoke npm.exe to manage your packages.  In your project folder, you will need a meta file named package.json that instructs npm on what to do.  The npm will go to the npm registry to find your missing packages and bring them into node_modules folder on your local machine. 
Picture
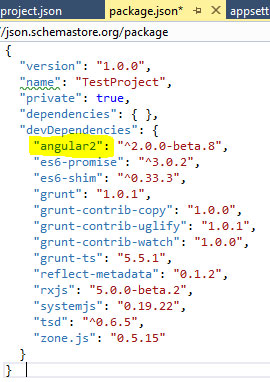
​So in Visual Studio 2015, all you need to do is to open the package.json file, and add the name of the package and its version under the devDependencies section, and as soon as you hit the save button, Visual Studio will act as a proxy to npm to grab those packages for you. 
Picture
Showing the content of package.json used by npm.exe
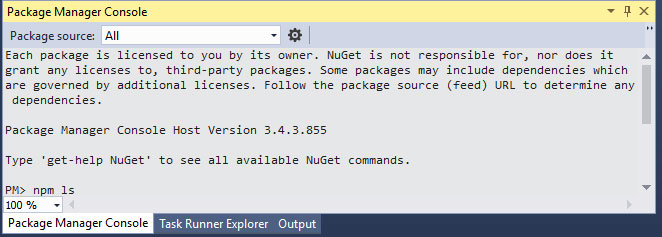
But if you preferred doing it manually, you can do it in the Package Manager Console inside the Visual Studio.  
Picture

​The Build System

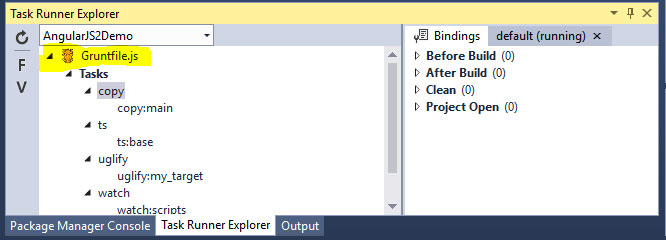
​As you may have notice that each package manager has its own destination folder for the packages that it stores. Bower stores in the bower_components folder and NPM stores in the node_modules folder. In this case, we need to have another build step to copy those packages into our web development or production folder from the package folder.  For example, if we use AngularJS in the development, our AngularJS files may be located in node_modules folder if we use NPM, and we want packages to be located in our wwwroot/js folder.  Grunt and Gulp are the two of the most popular build systems out there to do these tasks. However, NPM can act as a build tool as well if you use its createReadStream function.  Nevertheless, if you need more complex build process, many people will likely choose either Grunt or Gulp since it has a lot of plugins to choose from.  In Visual Studio, these tasks located inside the Grunt or Gulp script can be managed via Task Runner Explorer.  You can do more inside the Task Runner Explorer when you right click on the task.
Picture
Conclusion
 
In this article, we have seen how these little tools such as the npm, grunt, and many others, are quite powerful, and they can do a lot of things for us as developers.  The tools help us from managing our dependencies to our build process, and they could also help us test and do continuous integration if we spend some time to configure them with scripts and a workable deployment pipeline can be built at the end. However, because of these tools live in an open source environment, there is no one to supervise and manage, it has its advantages, and there are some disadvantages as well.  When you need a tool's plugin to do something, you may find that you need more dependencies after dependencies, and sometimes it may add unwanted file size to your project.  There are more tools to fill the gaps of other tools. There are management tools to manage other management tools.  There are fixes and upgrades within the tools, configuration scripts may work for a few months and may not work if you upgrade certain tools.  It is an age of disruptor overboard, and it is quite a chaos if you think about it.  Regardless of the frustration that some developers may have experienced, we need to do our part of finding the right tools by testing and prototyping the workflows that fit our needs.  We should always have backup copies of these tools stored somewhere you can access since the process often assumes that you have an internet access.  On the security issue, we should also be alert to the risk of having such an easy but powerful tool like the npm.  Since node.js was already installed on our side, and this is always a vulnerability of allowing the malicious package to come in without any supervision.  Hopefully, the technology will become more mature and reliable sooner. ​The developers can spend more time on building great software and spend less time on finding the right tools for the right jobs and then figuring out how to use the tools to their best interests.  Perhaps, Visual Studio can tame the modern web development tools in the future version.
0 Comments
<<Previous

    Arthur Wang

    @ArthurWangLA
    MCSD App Builder
    MCSD Web Applications
    ​Member of Windows Insider Program & HoloLens Developer Community & Dev Center Insider Program

    Over 17+ years of  experience in web-based software development & management.  Specialized in Microsoft technology with c# language and its architecture design.  MCSD, MCSE, Microsoft Specialist, MCP + Internet, and B.S. from UCLA

    Archives

    August 2018
    March 2018
    January 2017
    December 2016
    May 2016
    April 2016
    March 2016
    February 2016
    April 2014

    Categories

    All
    API
    Arduino
    ASP.NET
    Cognitive
    CSS
    Database
    Deep Learning
    DevOps
    Electronics
    Flexbox
    HTML5
    IoT
    Katana
    Machine Learning
    Management
    .NET
    .NET Core
    Neural Network
    OWIN
    Programming
    Programming Tools
    Recognition
    Security
    SQL Server
    UWP
    Visual Studio
    Web API
    Web Developer

    RSS Feed

    Latest Articles

© 2014-2020 ArthurWiz.com All Rights reserved. | Home | About |
Protected by Copyscape